Introduction
In enterprise application, one situation faced frequently by developer is how to design temporary data saving feature. The temporary data saving feature will reduce the chance of data lost caused by session timeout, computer down, or network issue. Also, temporary data saving feature allow certain business process last for several business days without locking the existing data or slow down other business processes. There are many ways to design temporary data saving, such as saving the data into business table with status flag or saving the data into mirror table of your business table. In this article, I will show you how to use Entity Framework Self-Tracking Entity (acronym STE) to handle this situation that will not just keep the cleanness of your data model (database tables), also give enough extensibility for handling more temporary data saving request.
Temporary Data Saving
In a normal enterprise application, when there are a lot of data need to be entered into system at a time or the entered data must be verified and approved before seen by other users, user could face data lost problem or draft data issue. Thinking about this, if user typed data for several hours in a web based application, then hit submit button try to save the data, they will sometimes get “Session Timeout” instead of “Save Success”. How frustrated user will be? Also, thinking about this, when new customer data is entered into system by business analyst, before the customer data gets verified and approved by business department manager, other department user can already see and use this customer to do business. How serious consequence could be caused and how big the mess needs to be clean up later on? To resolve above mentioned issues, we can provide user a way to save data temporarily. The temporary saved data is only seeable by data input person or certain other people, this give data input person the ability to periodically save the work without wait to the end. Also prevent other department users from seeing and using the draft data.
Entity Framework Self-Tracking Entity
Before applying domain driven design, all the business data is processed with RecordSet in enterprise application, therefore, the most common solution for temporary data saving are either have status flag in business table to indicate the business data is not finalized or have a mirror table of business table to store temporary data. The drawback of both solutions are very cumbersome and requiring a lot of changes to existing application. Also, those solutions will result in big amount of additional data or tables that mess up the entire application. After applying domain driven design, we design application to have a centralized domain layer that uses domain entity to story business data. We can serialize the domain entity and save into a temporary location. How to support domain entity serialization and deserialization? We can design domain entity as Entity Framework Self-Tracking Entity. Entity Framework is an ORM framework from Microsoft. It is used to handle paradigm mismatch between domain model and data model. By using it, we will have an elegance domain model without worry about how to persistent it into database. There are many ways to design domain model. Such as POCO style domain model. The POCO style domain model is a simple .NET class that can be directly handled by ORM framework without any ORM required properties or methods. The cleanness and simplicity attracts many enterprise application developers to adopt it in their application. However, it needs more work on supporting change tracking and serialization, especially XML serialization. To have class supports change tracking and serialization, Entity Framework comes up with the Self-Tracking Entity idea. Strictly speaking, the Self-Tracking Entity is not pure POCO style domain entity because there are many properties and methods are added in domain entity to support self-tracking and serialization. But, because all the self-tracking related properties and methods and serialization/deserialization supporting are added at source code level. It is not tight with Entity Framework, so you should still be able to reuse the domain model with other ORM framework, such as NHibernate. The design purpose of Self-Tracking Entity is to allow domain entity to be serialized into XML in service application, and send over web service, and deserialize back in web service client application. In here, I am not really to use it this way. I will use the serializable ability of Self-Tracking Entity to help on temporary data saving.
The Idea
The idea is to use Self-Tracking Entity as domain entity, and have a table to store serialized XML of domain entity object. By doing this, we have following benefits:
1. Temporary data is completely separated with finalized data.
2. Easy to implement. Only one table need to be added and no change to any current business tables or codes.
3. Extensible. Add temporary data saving support for additional domain entity will not cause change to any existing tables or codes.
The Implementation
A simple ASP.NET MVC application is used here to demonstrate how to implement this idea. The demo application is designed as employee information management application. You can add, update, or delete employee.
Data Model
There are only two tables in demo application, one is business table Employee and another one is temporary data storage table TempData.
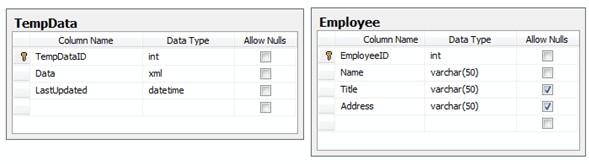
The Data field in TempData table is used to store serialized business object XML. Obviously, the DataType is XML.
The Data field in TempData table is used to store serialized business object XML. Obviously, the DataType is XML.
Visual Studio Solution Structure
There are four projects in demo application, Demo.Base, Demo.Data, Demo.Models, and Demo.Web.
Demo.Base: The common library of the demo application. It contains DataHelper to handle serialization and deserialization, and interface for dependency injection.
Demo.Data: The data access layer. It implements repository pattern to wrap up Entity Framework.
Demo.Models: The domain layer. It contains self-tracking entity style domain entities and data access interfaces.
Demo.Web: The web user interface layer. It’s built with ASP.NET MVC that has good separation of concerns and test friendly structure.
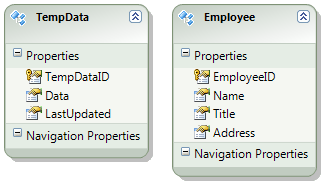
Entity Class and Context Class
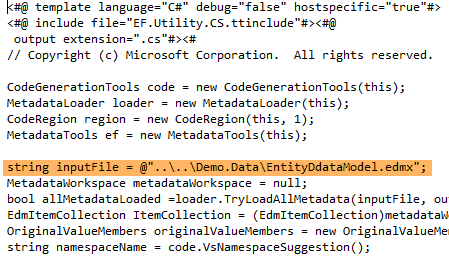
The most important classes supporting temporary data saving reside in Demo.Data project and Demo.Models project. Let’s take a look how to generate them. First, we need to add EntityDataModel.edmx from data model (database) with Entity Framework Entity Data Model wizard.
By select “Add Code Generation Item…” in Entity Data Model context menu, you can add an ADO.NET Self-Tracking Entity Generator template into the project.
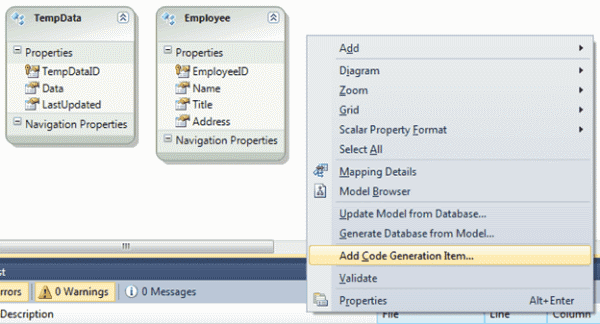
Give the name STE.tt.
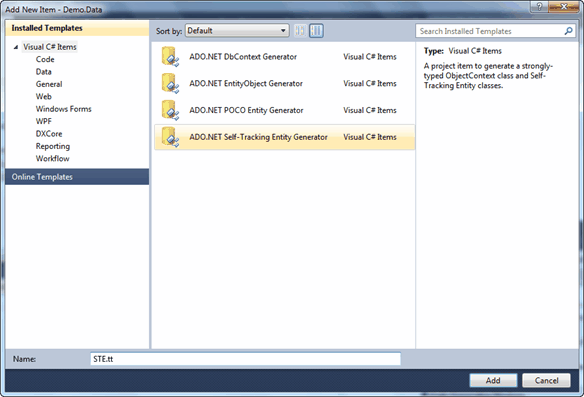
After clicked Add button, you will see there are two files added in project, STE.tt and STE.Context.tt. The STE.tt is the T4 template file of your domain entity classes and the STE.Context.tt is the T4 template file of Entity Framework context classes. Because Demo.Data project is data access layer, so need to move STE.tt file into Demo.Models project. After moved it, a small change needed in STE.tt file to point input file, EntityDataModel.edmx, to the original place.
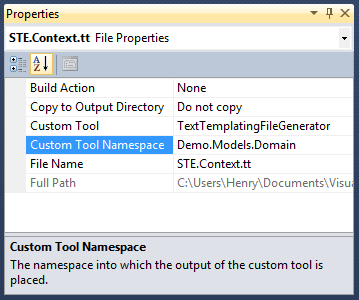
At the same time, STE.Context.tt need to be updated to have the right Custom Tool Namespace, so the context classes can still reference to domain entity classes.
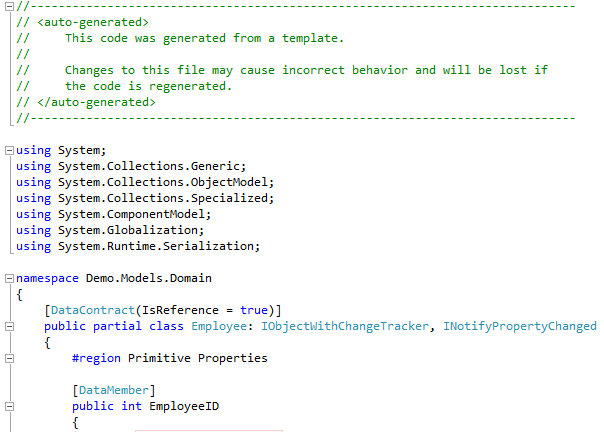
If you look at the generated Employee class, you can see there are some extra properties and methods in addition to those properties from Employee table. Those extra properties and methods added by Self-Tracking Entity template are for tracking change and serialization/deserialization purpose.

Also, the class has DataContract attribute on class and DataMember attribute on property to support serialization and deserialization.
By select “Add Code Generation Item…” in Entity Data Model context menu, you can add an ADO.NET Self-Tracking Entity Generator template into the project.
Give the name STE.tt.
After clicked Add button, you will see there are two files added in project, STE.tt and STE.Context.tt. The STE.tt is the T4 template file of your domain entity classes and the STE.Context.tt is the T4 template file of Entity Framework context classes. Because Demo.Data project is data access layer, so need to move STE.tt file into Demo.Models project. After moved it, a small change needed in STE.tt file to point input file, EntityDataModel.edmx, to the original place.
At the same time, STE.Context.tt need to be updated to have the right Custom Tool Namespace, so the context classes can still reference to domain entity classes.
If you look at the generated Employee class, you can see there are some extra properties and methods in addition to those properties from Employee table. Those extra properties and methods added by Self-Tracking Entity template are for tracking change and serialization/deserialization purpose.
Also, the class has DataContract attribute on class and DataMember attribute on property to support serialization and deserialization.
Saving Temporary Data
The Demo.Web project uses Self-Tracking Entity classes and Context classes together to achieve the saving temporary data goal.
From the CreatTempData action method in Employee controller, we can see how we save the new created Employee object as temporary data
1. New an Employee object with user entered data.
2. Serialize the new Employee object to XML string.
3. Clear context.
Note: because we are using Unit-of-Work pattern in here to handle database operation, so we need to call Context.Clear() to close the current Unit-of-Work, therefore the following Context.Commit will be in a new Unit-of-Work. This will prevent objects other than TempData from be committed into database.
4. New a TempData object and store XML of the new Employee object into Data property. 5. Call Create method of repository to attach the new TempData object with context. 6. Commit the new created TempData object into database.
CreateTempData action method code snippet
[HttpPost]
        [ActionName("Create")]
        [AcceptVerbs(HttpVerbs.Post)]
        [AcceptParameter(Name="button", Value="Create Temp Data")]
        public ActionResult CreateTempData(EmployeeVM employeeVM)
        {
            IContext context = Demo.Models.Registry.Context;
            ITempDataRepository tempDataRepository = Demo.Models.Registry.RepositoryFactory.GetTempDataRepository();

            if (ModelState.IsValid)
            {
                // New an Employee oject with user entered data
                Employee employee = new Employee();
                employee.Name = employeeVM.Name;
                employee.Title = employeeVM.Title;
                employee.Address = employeeVM.Address;

                // Serialize the new Employee object to XML string
                string xml = DataHelper.SerializeEntity<Employee>(employee);

                // Clear context
                context.Clear();

                // New a TempData object and store XML of the new Employee object into Data property
                TempData tempData = new TempData();
                tempData.Data = xml;
                tempData.LastUpdated = DateTime.Now;

                // Call Create method of repository to attach the new TempData object with context
                tempDataRepository.Create(tempData);

                // Commit the new created TempData object into database
                context.Commit();

                return RedirectToAction("Index", "Home");
            }
From the SaveEmployee action method of Employee controller, we can see how to save temporary data into real business table.
1. Find the TempData object from database.
2. Deserialize the value of data property back to Employee object.
3. Attach Employee object into context.
4. Update the Employee object with the latest data entered by user.
5. Delete TempData object from context.
6. Commit the Employee object into database and delete TempData object from database.
SaveEmployee action method code snippet
[HttpPost]
        [ActionName("UpdateTempData")]
        [AcceptVerbs(HttpVerbs.Post)]
        [AcceptParameter(Name = "button", Value = "Save Employee")]
        public ActionResult SaveEmployee(EmployeeVM employeeVM)
        {
            IContext context = Demo.Models.Registry.Context;
            ITempDataRepository tempDataRepository = Demo.Models.Registry.RepositoryFactory.GetTempDataRepository();
            IEmployeeRepository employeeRepository = Demo.Models.Registry.RepositoryFactory.GetEmployeeRepository();

            if (ModelState.IsValid)
            {
                // Find the TempData object from database
                TempData tempData = tempDataRepository.Find(td => td.TempDataID == employeeVM.LinkTempDataID);

                // Deserialize the value of data property back into Employee object
                Employee employee = DataHelper.DeserializeEntity<Employee>(tempData.Data);

                // Attach the Employee object into context
                employeeRepository.Attach(employee);

                // Update the Employee object with the latest data entered by user
                employee.Name = employeeVM.Name;
                employee.Title = employeeVM.Title;
                employee.Address = employeeVM.Address;

                // Delete TempData object from context
                tempDataRepository.Delete(tempData);

                // Commit the Employee object into database and delete TempData object from database
                context.Commit();

                return RedirectToAction("Index", "Home");
            }

            return View(employeeVM);
        }
Following is the sample Employee object XML stored in TempData table
<Employee xmlns="http://schemas.datacontract.org/2004/07/Demo.Models.Domain" xmlns:i="http://www.w3.org/2001/XMLSchema-instance" xmlns:z="http://schemas.microsoft.com/2003/10/Serialization/" z:Id="i1">
  <Address>Main Street, Edison, NJ</Address>
  <ChangeTracker z:Id="i2">
    <ExtendedProperties />
    <ObjectsAddedToCollectionProperties />
    <ObjectsRemovedFromCollectionProperties />
    <OriginalValues />
    <State>Added</State>
  </ChangeTracker>
  <EmployeeID>0</EmployeeID>
  <Name>Tom</Name>
  <Title>Manager</Title>
</Employee>
Summary
With Entity Framework Self-Tracking Entity, we can easily implement temporary data saving feature. This solution is simple, elegance, and extensible, also it has very minor impact on existing application. If you really don’t want to use Entity Framework Self-Tracking Entity, you can have POCO style domain entity and use DTO as the media to serialize and deserialize domain entity object to and from XML.
Using the Code
The code is developed in Visual Studio 2010. You need to firstly create database, SaveTempDataWithSTE, in SQL Server, and then run the attached SaveTempDataWithSTE.sql script to create Employee table and TempData in it. Before running the code, remember to update connection string in configuration file to your local connection string.
No comments:
Post a Comment