Friday, December 23, 2011

Understanding Amazon Web Services

Introduction

As the world largest online retailer, Amazon is also known as the pioneer of the cloud computing wave. It provides Amazon EC2 and S3 as first infrastructure-as-a-service (iaas). Some developers will think Amazon EC2 and S3 are Amazon’s Cloud Computing platform. Actually it is just two of products in Amazon cloud computing solution – Amazon Web Services. In this article, I will show all the cloud products in Amazon web service family to let developers have a big picture of Amazon cloud computing solution, so developers can build application to run on cloud. 

History of Amazon Could Computing

A decade ago, Amazon rose as one of the first online retailer. In order to provide highly reliable and scalable web site for shopper around the world, Amazon built many large data centers in US and around the world. Therefore, it accumulates a lot of experience on building, managing, and expanding data centers. After virtualization technology become maturate, dynamically creating, assigning, updating, and removing virtual server are possible, Amazon utilizes the virtualization technology to rebuild its infrastructure for itself, and also opens up as cloud computing service to external companies and developers.

August 25, 2006, Amazon announced a limited public beta of EC2. Access to EC2 was granted on a first come first served basis.
October 16, 2007, Amazon added two new instance types, large and extra-large.
May 29, 2008, Amazon added two more instance types, high-CPU medium and high-CPU extra-large.
March 27, 2008, Amazon added three new features. These features included static IP addresses, availability zones and user selectable kernels.
August 20, 2008, Amazon added Elastic Block Store (EBS).
October 23, 2008, Amazon EC2 beta label is dropped. It is moved to production stage. At the same day, Amazon announced other new features: a service level agreement for EC2, Microsoft Windows in beta form on EC2, Microsoft SQL Server in beta form on EC2.
May 18, 2009, Amazon added AWS management console, load balancing, auto-scaling, and cloud monitoring services.
December 2010, Amazon offers a bundle of free resource credits to new account holders. The credits are designed to run a “micro” sized server for one year. Charges are applied on demand so the credit need not be used in the first month.

Amazon Web Services Detail

There are many types of cloud products in Amazon Web Services. It includes Compute, Content Deliver, Database, Deployment & Management, E-Commerce, Messaging, Monitoring, Networking, Payments & Billing, Storage, Support, Web Traffic, and Workforce.
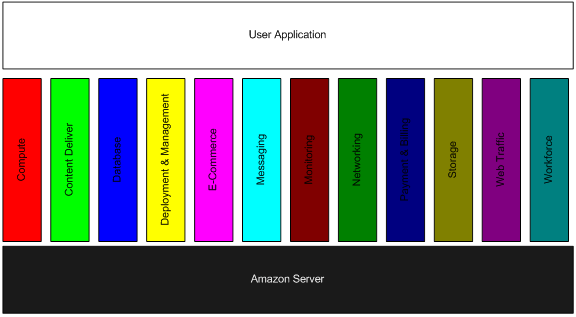
Amazon Web Services

Compute

The Compute category is the core category of Amazon Web Services. It contains products to allow developers use amazon’s computing power to run application or web site, such as running web application in Amazon’s EC2. There are three products in this category, Amazon Elastic Compute Cloud (EC2), Amazon Elastic MapReduce, and Auto Scaling.
Amazon Elastic Compute Cloud (EC2) – it delivers scalable, pay-as-you-go compute capacity in the cloud.
Amazon Elastic MapReduce – it is a web service that enables businesses, researchers, data analysts, and developers to easily and cost-effectively process vast amounts of data.
Auto Scaling – it allows you to automatically scale your Amazon EC2 capacity up or down according to conditions you define.

Content Delivery

This category contains products that can help delivering content to users. There is only one product in this category, Amazon CloudFront.
Amazon CloudFront – it is a web service that makes it easy to distribute content with low latency via a global network of edge locations.

Database

This category contains products that can store user data temporarily or permanently in the cloud. There are three products here, Amazon SimpleDB, Amazon Relational Database Service (RDS), and Amazon ElastiCache.
Amazon SimpleDB – it works in conjunction with Amazon S3 and Amazon EC2 to run queries on structured data in real time.
Amazon Relational Database Service (RDS) – it is a web service that makes it easy to set up, operate, and scale a relational database in the cloud.
Amazon ElastiCache – it is a web service that makes it easy to deploy, operate, and scale an in-memory cache in the cloud.

Deployment & Management

This category contains products that can help developers to deploy their application into cloud and manage their application. There are two products here, AWS Elastic Beanstalk and AWS CloudFormation.
AWS Elastic Beanstalk – it is an even easier way to quickly deploy and manage applications in the AWS cloud. You simply upload your application, and Elastic Beanstalk automatically handles the deployment details of capacity provisioning, load balancing, auto-scaling, and application health monitoring.
AWS CloudFormation – AWS CloudFormation is a service that gives developers and businesses an easy way to create a collection of related AWS resources and provision them in an orderly and predictable fashion.

E-Commerce

This category contains products that are for building e-commerce application. There is only one product here, Amazon Fulfillment Web Service.
Amazon Fulfillment Web Service (FWS) – it allows merchants to deliver products using Amazon.com’s worldwide fulfillment capabilities.

Messaging

This category contains products for sending and receiving messages. There are three products here, Amazon Simple Queue Service (SQS), Amazon Simple Notification Service (SNS), and Amazon Simple Email Service (SES).
Amazon Simple Queue Service (SQS) – it provides a hosted queue for storing messages as they travel between computers, making it easy to build automated workflow between Web services.
Amazon Simple Notification Service (SNS) – it is a web service that makes it easy to set up, operate, and send notifications from the cloud.
Amazon Simple Email Service (SES) – it is a highly scalable and cost-effective bulk and transactional email-sending service for the cloud.

Monitoring

This category contains products that provide information of how your resources are used. There is only one product here, Amazon CloudWatch.
Amazon CloudWatch – it is a web service that provides monitoring for AWS could resources, starting with Amazon EC2.

Networking

This category contains products that can be used to build a virtual network. There are four products here, Amazon Route 53, Amazon Virtual Private Cloud (VPC), AWS Direct Connect, and Elastic Load Balancing.
Amazon Route 53 – it is a highly available and scalable Domain Name System (DNS) web service.
Amazon Virtual Private Cloud (VPC) – it lets you provision a private, isolated section of the Amazon Web Services (AWS) Cloud where you can launch AWS resources in a virtual network that you define. With Amazon VPC, you can define a virtual network topology that closely resembles a traditional network that you might operate in your own datacenter.
AWS Direct Connect – it makes it easy to establish a dedicated network connection from your premise to AWS, which in many cases can reduce your network costs, increase bandwidth throughput, and provide a more consistent network experience than Internet-based connections.
Elastic Load Balancing – it automatically distributes incoming application traffic across multiple Amazon EC2 instances.

Payments & Billing

This category contains products that can add payment function in your cloud based application. There are two products here, Amazon Flexible Payment Service (FPS) and Amazon DevPay.
Amazon Flexible Payment Service (FPS) – it facilitates the digital transfer of money between any two entities, humans or computers.
Amazon DevPay – it is a billing and account management service which enables developers to collect payment for their AWS applications.

Storage

This category contains products that are used to store unstructured data. This is different with Database category. There are three products here, Amazon Simple Storage Service (S3), Amazon Elastic Block Store (EBS), and AWS Import/Export.
Amazon Simple Storage Service – Amazon Simple Storage Service provides a fully redundant data storage infrastructure for storing and retrieving any amount of data, at any time, from anywhere on the Web.
Amazon Elastic Block Store (EBS) – it provides block level storage volumes for use with Amazon EC2 instances. Amazon EBS volumes are off-instance storage that persists independently from the life of an instance.
AWS Import/Export – it accelerates moving large amounts of data into and out of AWS using portable storage devices for transport.

Support

This category contains products that can be used to get support from Amazon. There is only one product in this category, AWS Premium Support.
AWS Premium Support – it is a one-on-one, fast-response support channel to help you build and run applications on AWS Infrastructure Services.

Web Traffic

This category contains products that can help developer to get website traffic statistics. There are two products in this category, Alexa Web Information Service and Alexa Top Sites.
Alexa Web Information Service – it makes Alexa’s huge repository of data about structure and traffic patterns on the Web available to developers.
Alexa Top Sites – it exposes global website traffic data as it is continuously collected and updated by Alexa Traffic Rank.

Workforce

This category contains products that allow companies to award work to developers and let developers to find work from companies. There is only one product in this category, Amazon Mechanical Turk.
Amazon Mechanical Turk – it enables companies to access thousands of global workers on demand and programmatically integrate their work into various business processes.

Netflix

It’s interesting to know we are using services on Amazon cloud every day without notice it. Netflix streaming service is built on top of Amazon cloud platform. It let Amazon to provide a reliable infrastructure, so Netflix can focus on building and improving its business. By using Amazon cloud service, Netflix can easily deal with the increase demanding of their movie services.
Sunday, December 4, 2011

MVC on Azure for Beginner

Introduction

Windows Azure platform is Microsoft’s cloud solution. Compare to other cloud solutions, the biggest advantage is it seamlessly integrate with Microsoft .NET framework and development environment, therefore, regular .NET application can be moved to Azure effortless. This article will show how to develop and deploy an ASP.NET MVC web application to Windows Azure platform.

Develop a MVC application with Azure SDK

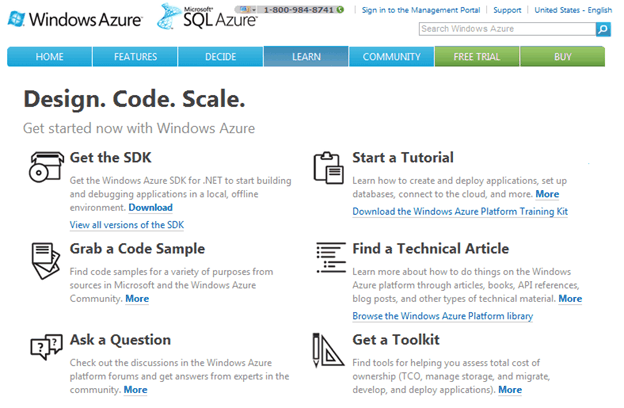
In order to develop an application that can run on Windows Azure, you must have Windows Azure SDK installed on your computer. The Azure SDK can be downloaded from Microsoft Windows Azure portal site.
Windows Azure Site
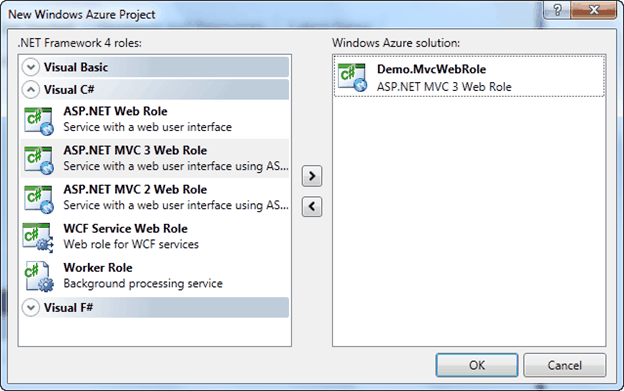
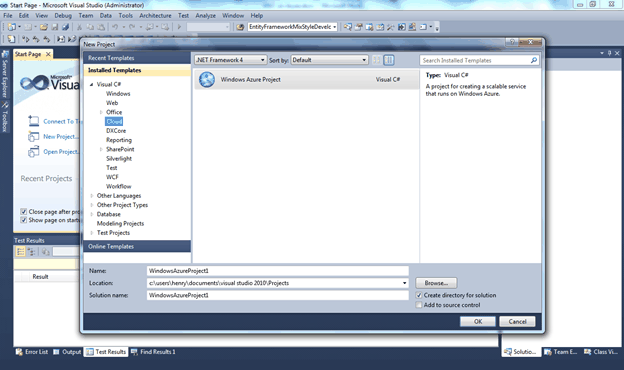
After installed Windows Azure SDK, you can open up Visual Studio to start a new project. There is a new project category Cloud in your Visual Studio project template. It has only one project template, Windows Azure Project.
Windows Azure Solution
After selected Windows Azure Project, you can choose different Roles. Role represents the application running in Windows Azure platform. There are three types of role defined in Windows Azure platform, web role, windows role and VM role. Web role stands for a web application, windows role stands for a windows service application, and VM role stands for a standalone Windows environment. In Visual Studio, you can create ASP.NET Web Role, ASP.NET MVC 3 Web Role, ASP.NET MVC 2 Web Role, and WCF Service Web Role. Not any application is suitable for running in Windows Azure.
New Windows Azure Project
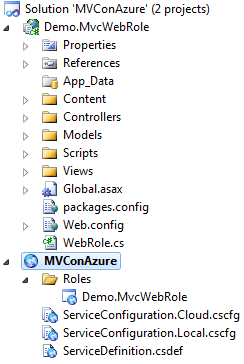
If selected ASP.NET MVC 3 Web Role project, you can follow the project wizard to create the web application. This project wizard is identical to the normal ASP.NET MVC 3 project wizard. Below is what your solution end up with
Project Detail
If you compare this solution with a normal ASP.NET MVC solution, you will see an additional Azure project is in here. It contains configurations of our Windows Azure project. There are two kinds of configuration file: Service definition file, ServiceDefinition.csdef, and service configuration file, ServiceConfiguration.cscfg.
The service definition file defines all roles in your solution and their information that includes
1. Endpoint information. E.g. HTTP is used for web role.
2. Storage information. E.g.  local storage or Azure storage.
3. Any custom configuration information.
This is what ServiceDefinition.csdef file looks like in my Azure project
<?xml version="1.0" encoding="utf-8"?><ServiceDefinition name="MVConAzure" xmlns="http://schemas.microsoft.com/ServiceHosting/2008/10/ServiceDefinition"<WebRole name="Demo.MvcWebRole" vmsize="Small">    <Sites>      <Site name="Web">        <Bindings>          <Binding name="Endpoint1" endpointName="Endpoint1" />        </Bindings>      </Site>    </Sites>    <Endpoints>      <InputEndpoint name="Endpoint1" protocol="http" port="80" />    </Endpoints>    <Imports>      <Import moduleName="Diagnostics" />    </Imports>  </WebRole></ServiceDefinition>
The service definition cannot be changed at runtime. Any change requires a new deployment of your service. Your service is restricted in using only the network endpoints and resources that are defined in this file. You can think of this piece of the configuration as defining what the infrastructure of your service is, and how the parts fit together.
The service configuration file includes the entire configuration needed for the role instances in your service. Each role has its own configuration. The contents of the configuration file can be changed at runtime, which saves the need to redeploy your application when some part of the role configuration changes. You can also access the configuration in code, in a similar manner that you might read a web.config file in an ASP.NET application.
This is what ServiceConfiguration looks like in my Azure project
<?xml version="1.0" encoding="utf-8"?><ServiceConfiguration serviceName="MVConAzure" xmlns="http://schemas.microsoft.com/ServiceHosting/2008/10/ServiceConfiguration" osFamily="1" osVersion="*"<Role name="Demo.MvcWebRole">    <Instances count="1" />    <ConfigurationSettings>      <Setting name="Microsoft.WindowsAzure.Plugins.Diagnostics.ConnectionString" value="UseDevelopmentStorage=true" />    </ConfigurationSettings>  </Role></ServiceConfiguration>
You can compile and run the application right now. The application is not running in Visual Studio Cassini local web server as the normal ASP.NET MVC application. It’s running in Windows Azure Emulator. Windows Azure platform includes three major pieces, Windows Azure, SQL Azure, and Windows Azure AppFabric. The emulator is acting very similar to Windows Azure platform. It allow developer to run and debug application without deploy to the public cloud.
Note: sometime you will see error
Windows Azure Tools: Failed to initialize Windows Azure storage emulator. Unable to start Development Storage. Failed to start Storage Emulator: the SQL Server instance ‘localhost\SQLExpress’ could not be found.   Please configure the SQL Server instance for Storage Emulator using the ‘DSInit’ utility in the Windows Azure SDK.
This is because Windows Azure storage emulator default uses SQLExpress as the backend database. If you don’t have SQLExpress database installed or it is not installed with the default name, then Storage Eumlator will not able to find it. To fix this error, you can use DSInit to change storage emulator to point to your local SQLServer database.

Deploy Application to Windows Azure Public Cloud

To deploy the application to Windows Azure platform, you need to have Windows Azure account first. You can register a Windows Azure account for 90 days free trial. However, you need to provide your credit card information, so Microsoft can charge you to your credit card for any over the limit usage.  The deployment is very simple. You can publish your Windows Azure based application directly to Windows Azure public cloud in Visual Studio.
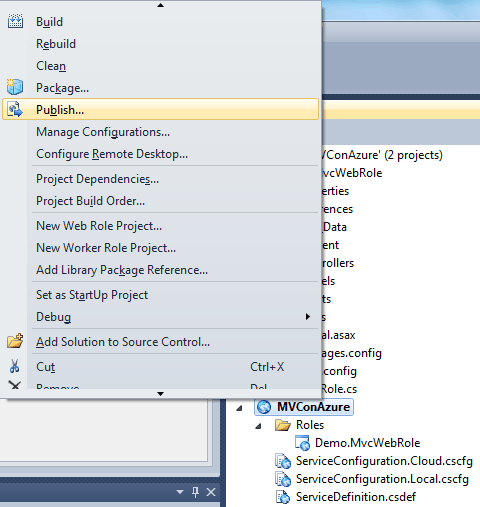
Publish
Right click the Azure project and select Publish menu item. This will bring up Publish Windows Azure Application window.
1. Select your subscription.
2. Select your setting. Give a host service name. This name will be used as your subdomain name.
Note: if this is the first time publishing application to Windows Azure Platform, you will be prompted to add a Windows Azure authentication setting.
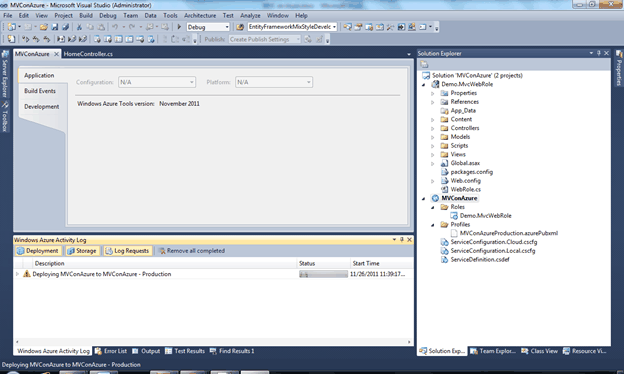
3. Click Pushing button to start the publish process. The Visual Studio will compile your application first, and then connect to Windows Azure platform with your account information to start deployment. There is new tab, Windows Azure Active Log, shows up in your Visual Studio IDE to display the progress of deployment. The entire deployment could take several minutes.
Publish Status in Visual Studio
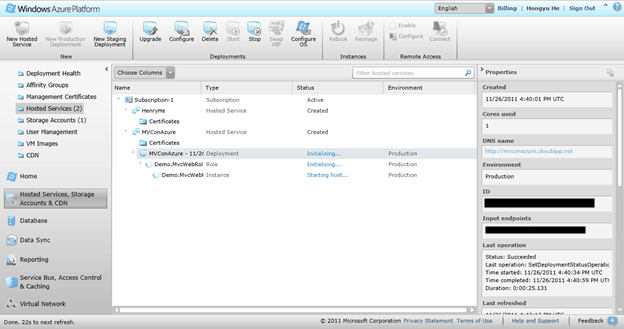
You can also view the deployment status in your Azure control panel
Publish Status in Azure
After the deployment completed, the Windows Azure Activity Log window shows status as completed and all deployment information.
Windows Azure Activity Log
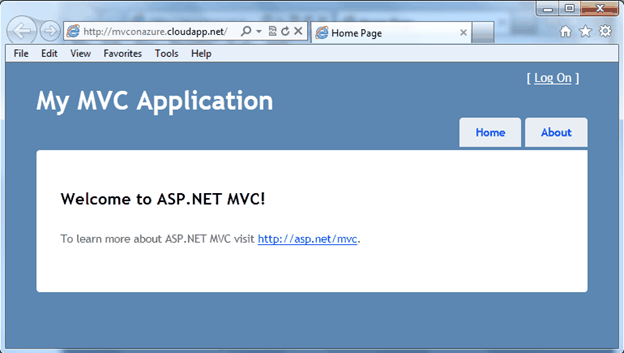
You can use the assigned URL, in here is http://mvconazure.cloudapp.net, to view just deployed MVC web application in Windows Azure public cloud.
Web Page

Summary

Cloud computing is getting popular right now because the benefits of cost saving, scalability, and easy implementation. The Windows Azure platform is the primary cloud computing choice for .NET application developers because it allows us to leverage all our .NET development knowledge to join the new trend.

Wednesday, November 23, 2011

Mixed Style Development in Entity Framework

Introduction

Entity Framework is the ORM framework from Microsoft. Microsoft provides three development styles for it: Database-First, Model-First, and Code-First. They all look promising in Microsoft sample projects. But, I couldn’t follow any of them all along in my recent project. I end up used a mixed style to develop the application.

Development Styles in Entity Framework

There are three development styles in Entity Framework provided by Microsoft for enterprise application development.

Database-First Development

Database-first development in Entity Framework is to have a database first, then generate the Entity Data Model from it. Before Object-Oriented Programming got attention, most enterprise applications (we used to call them MIS, Management Information Systems, in the old days) started with a data model. The reason to do this is because the database is the central piece of the application. Most enterprise applications mainly dealt with data and contained almost nothing but CRUD operations. On top of this, most business rules were stored in the database. Relational databases, such as Sybase, DB2, Oracle, or SQL Server, are all built on the same relational database concept and using SQL as the query language. They have been used for decades and most developers are familiar with them and know how to use them. Even now, there are still a lot of enterprise applications built around the database. Therefore, when Object-Oriented Programming got popular and developers moved to the ideas of building an application around a domain model, they still want to generate the domain model from the data model to save time and effort, or to smooth the transition. Database-First development has a lot of advantages. It can directly use any existing system’s data model. It allows most developers who have database experience to feel comfortable on the transition. Even developers can think in terms of the domain model. They sometimes still want to have the data model first because the data model tool is easy to use.
Pros:
  1. Easier for developers who have database experience.
  2. Easier for upgrading legacy systems that already have a mature data model in place.
  3. Easier for a system that mainly deals with data and only has CRUD operations.
Cons:
  1. The domain model generated is usually not very mature. Developer needs to fine tune it in the Entity Data Model designer. The limitations of the Entity Data Model does not allow the developer to improve much.
  2. Need corresponding partial class to add a domain rule method or additional properties for the domain model.
  3. The domain model is tied with Entity Framework. Therefore it’s not easy to use the domain model in other places that do not need the Entity Framework.
  4. A hard-core OO developer will not go this route because they want to think in terms of the domain model.

Model-First Development

When the Entity Framework team started to design this ORM tool, they really wanted to come up with something easier for the application designer and architect. Therefore, they created a pretty sophistic Entity Data Model designer to allow the application designer and architect to create visible entity data models in it. Then they can use the entity data model to generate the classes and tables.
Pros:
  1. Allow application designer and architect to think and design the model first.
  2. This model is database agnostic, therefore it can be used to generate tables in any relational database.
  3. The pretty sophistic Entity Data Model designer is easier for the application designer and architect. It saves time on defining the model in an XML file.
  4. Easier for a newbie who does not have much Entity Framework experience.
Cons:
  1. After generating the domain class, you still need to have a partial class for the corresponding domain class to add business rule methods and properties.
  2. The domain model is tied with Entity Framework. Therefore it’s not easy to use the domain model in places that do not need the Entity Framework.

Code-First Development

Developers from Java camp or who have worked with NHibernate before are already used to designing domain classes as POJO or POCO. This way, they can completely control how the domain model looks like and their behaviors without sacrificing too much on the limitations of the persistent mechanism. This is why the Code-First development style is used by seasoned developers. The Code-First development in Entity Framework can result in a very clean domain model. This domain model can be easily re-used in other applications or combined with other persistent mechanisms.
Pros:
  1. Can realize complicated domain requirements.
  2. Can have a very clean and elegant domain model that is represented with POCO.
  3. Not tied with Entity Framework, therefore domain model can be easily used in other applications or with other persistent mechanisms.
Cons:
  1. Needs more effort on creating domain classes.
  2. Needs to map the domain model to data model with the attribute or Entity Data Model.
  3. Not a good choice for an Entity Framework or OO Programming newbie. Only seasoned OO developers can really master it very well.

Mixed Style Development

Each development style in Entity Framework has its pros and cons. I personally like the Code-First development style more because a decent domain model is very crucial to an enterprise application in the long run. But I don’t want to hand type every class, especially when the data model is already available or creating a data model is easier in the requirement analysis stage. Therefore, what I actually did is to start with Database-First development style in Entity Framework, then evolve the data model into a pure POCO style domain model, eventually switching to Code-First development style.

Data Model

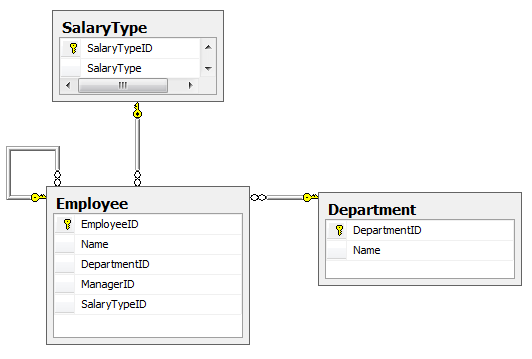
I usually start with a data model first when the system already has a pretty complete data model or when the data model is easier to communicate with business people. Just use Visio or any data model tool, and I can quickly finish the data model and generate tables in the database. In here, I have a sample employee management system that has a data model like this:
ER Diagram

Entity Data Model

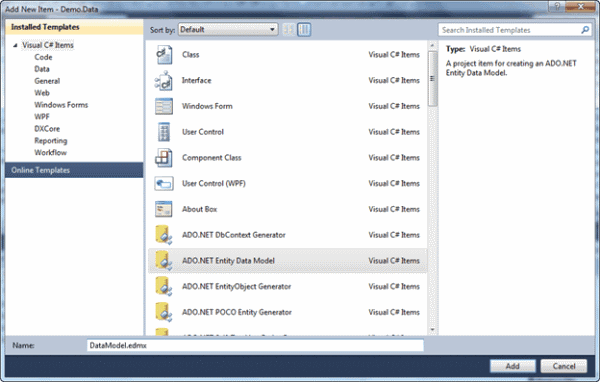
Create a Class Library project in Visual Studio. Then add an ADO.NET Entity Data Model item in it calledDataModel.edmx.
Add Entity Data Model
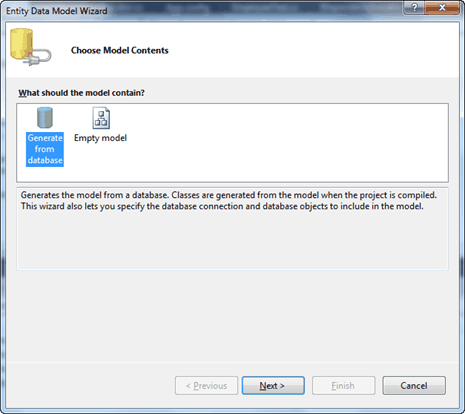
Follow the wizard and choose the “Generate from database” option.
Generate From Database
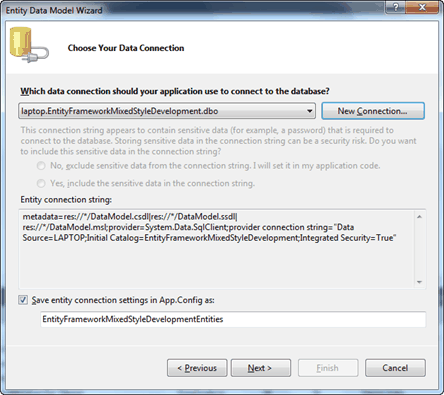
Then, create a new connection string for the database, and give the name of the entity connection setting.
Choose Data Connection
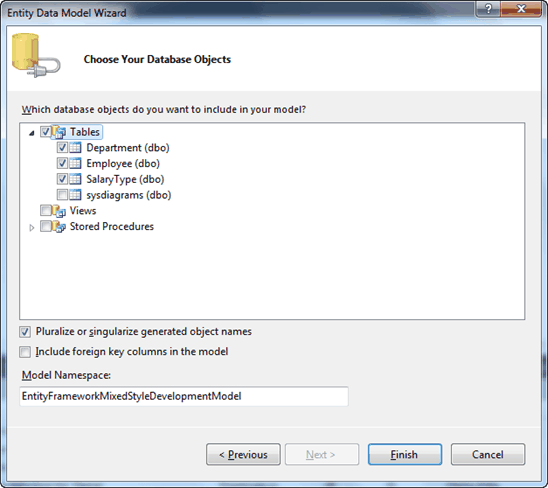
Then, select the tables you want to include in the Entity Data Model and provide the namespace. One thing I usually do in here is uncheck the “Include foreign key columns in the model” option. The reason for doing this is to avoid the foreign key identity field being added into the Entity Data Model. The Entity Data Model uses the navigation property to represent the association between the current entity and another entity. Having a foreign key ID field in your model is a trade-off for some special cases or for performance reasons. I really don’t like it because it pollutes my model and confuses the developer about which one to be used.
Choose Database Objects
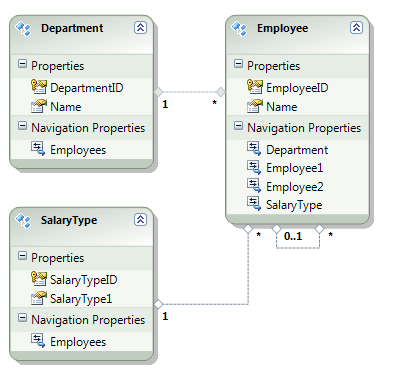
In the end, click the Finish button to generate the Entity Data Model.
Entity Data Model

Fixing the Entity Data Model

If you compare the just generated Entity Data Model with the Data Model, you will wonder why it is so different. In the data model, we have an employee table that is used to store employee information. The employee is identified with the EmployeeID in the table and it is identified with Name in real life. An employee could have a manager that is also an employee. Hence, there is a ManagerID column in the Employee table to reference to itself. The employee has a SalaryTypeID field that represents the salary type. It references the SalaryType table for detailed salary type information, such as By Hour or By Annual. An employee must belong to a department and a department can contain multiple employees. According to the data model explanation, the Entity Data Model automatically generated from the Data Model doesn’t really reflect what we think. There are two unclear navigation fields, Employee1 and Employee2, in the Employee entity.
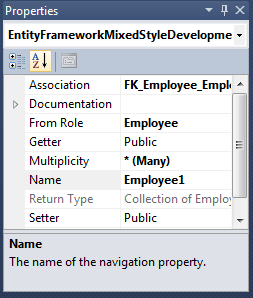
Employee1 has Multiplicity “*(Many)”:
Employee1 Property
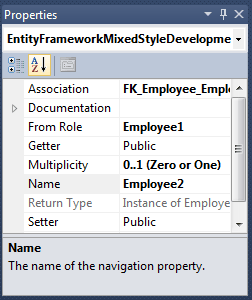
Employee2 has Multiplicity “0..1 (Zero or One)”:
Employee2 Property
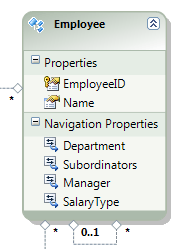
From the property detail information, we can tell Employee1 represents an Employee collection, and also means all the employees the current employ is in charge of. Employee2 represents the manager of the current employee. Hence, we should change the name of the navigation fields to Subordinators and Manager to reflect the real meaning.
Employee Entity
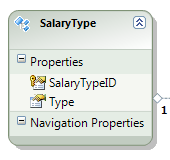
The SalaryType entity has a different situation. There is an employees navigation field on the SalaryType entity. It represents all the employees that have the same salary type. However, if you have some experience with enterprise applications, you will know the salary type as a lookup entity usually only need be referenced from a business entity. To get all business entities directly from the lookup entity is not so critical. You can accomplish it with a LINQ query even when there is no collection property in the lookup entity. By removing the employees navigation property from the SalaryType entity will simplify your Entity Data Model and make the model more focused on the important business problems. Another issue in the SalaryType entity is the SalaryType1 property. The SalaryType column in the SalaryType table is used to represent the type of salary. However, because of the “limitation” of a .NET class that cannot have a property name same as the class name, the Entity Data Model generation wizard changes the illegal name to have the number 1 at the end. The salarytype1 property looks ugly from the developer’s view. We should change it to “Type” to make it more meaningful. Following is what the SalaryType entity looks like after the changes:
Salary Type Entity
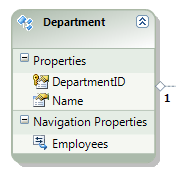
The Department entity is the only entity that doesn’t need to be fixed. Department has an Employees collection that represents all the employees in the current department. The employee entity also has a Department property to reference back to the department. It is a parent-child relationship.
Department Entity

POCO Style Domain Model

If you stop in here, you will have a pretty good Database-First application. Your Domain Model can be auto-generated from the Entity Data Model during the build process. But our goal is to have a domain model that is composed with POCO style classes and no dependency on the Entity Framework. This kind of a domain model can be easily reused in different applications with other persistent technologies, such as ADO.NET or NHibernate. You can also have a different repository system, such as File. So, how do we get the POCO style domain model? The first thing we want to do is to clear up Custom Tool.
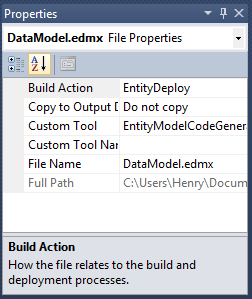
brData Model EDMX
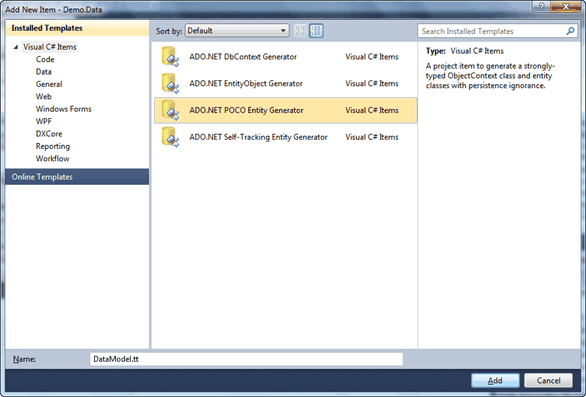
The Custom Tool setting is by default EntityModelCodeGenerator. This setting is used to tell the compiler to generate domain classes from the Entity Data Model. By clearing it up, we will not use it to generate domain classes. The reason is we want to use another code generator template, the ASP.NET POCO Entity Generator. This template is used to create POCO style domain entity classes for us. A POCO style domain entity contains only domain entity properties and methods. There is no entity framework related code in it. You can use mouse right click onDataModel.edmx to bring up the context menu, and then select the Add Code Generation Item… menu to open up the Add New Item window. Select the ADO.NET POCO Entity Generator and give DataModel.tt as the generator template name.
Note: if you directly add this template in the project instead of creating it from the DataModel.edmx context menu, you will get an error when trying to generate domain classes. This is because the template added fromDataModel.edmx has a related DataModel file location set up.
Add POCO Entity Generator
After you have the POCO entity generator template in your project, you will see a list of domain entity classes generated automatically. The domain entity classes will be re-generated after changing DataModel.tt.
POCO Classes
Department domain entity class looks like this:
//------------------------------------------------------------------------------
// <auto-generated>
//     This code was generated from a template.
//
//     Changes to this file may cause incorrect behavior and will be lost if
//     the code is regenerated.
// </auto-generated>
//------------------------------------------------------------------------------

using System;
using System.Collections;
using System.Collections.Generic;
using System.Collections.ObjectModel;
using System.Collections.Specialized;

namespace Demo.Data
{
    public partial class Department
    {
        #region Primitive Properties
    
        public virtual int DepartmentID
        {
            get;
            set;
        }
    
        public virtual string Name
        {
            get;
            set;
        }

        #endregion
        #region Navigation Properties
    
        public virtual ICollection<Employee> Employees
        {
            get
            {
                if (_employees == null)
                {
                    var newCollection = new FixupCollection<Employee>();
                    newCollection.CollectionChanged += FixupEmployees;
                    _employees = newCollection;
                }
                return _employees;
            }
            set
            {
                if (!ReferenceEquals(_employees, value))
                {
                    var previousValue = _employees as FixupCollection<Employee>;
                    if (previousValue != null)
                    {
                        previousValue.CollectionChanged -= FixupEmployees;
                    }
                    _employees = value;
                    var newValue = value as FixupCollection<Employee>;
                    if (newValue != null)
                    {
                        newValue.CollectionChanged += FixupEmployees;
                    }
                }
            }
        }
        private ICollection<Employee> _employees;

        #endregion
        #region Association Fixup
    
        private void FixupEmployees(object sender, NotifyCollectionChangedEventArgs e)
        {
            if (e.NewItems != null)
            {
                foreach (Employee item in e.NewItems)
                {
                    item.Department = this;
                }
            }
    
            if (e.OldItems != null)
            {
                foreach (Employee item in e.OldItems)
                {
                    if (ReferenceEquals(item.Department, this))
                    {
                        item.Department = null;
                    }
                }
            }
        }

        #endregion
    }
}
Multiple things you will notice in the above code:
  1. There is a comment block at the top of the class file that reminds the developer not to add their own code in this file because the generator could overwrite all the changes.
  2. The namespace of the department class is Demo.Data. This is my repository implementation layer name.
  3. The department class is a partial class. Hence I can add another department partial class in the Demo.Data project to have my own properties or methods without getting overwritten by the code generator.
  4. There is an Association Fixup section that contains code to correct the parent-child relationship for Department and Employee.
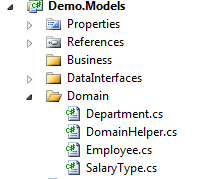
I like all the domain entity classes generated with the ASP.NET POCO Entity Generator, but I don’t like the idea of binding domain entity classes with the repository layer. Therefore I made a big change. I changed the generator template to generate the class code I want. Then I copied them all into the Demo.Models project.
Domain Classes
The Department class looks like this after the modified generator template:
using System;
using System.Collections;
using System.Collections.Generic;
using System.Collections.ObjectModel;
using System.Collections.Specialized;

namespace Demo.Models.Domain
{
    public class Department
    {
        #region Primitive Properties
    
        public virtual int DepartmentID
        {
            get;
            set;
        }
    
        public virtual string Name
        {
            get;
            set;
        }

        #endregion
        #region Navigation Properties
    
        public virtual ICollection<Employee> Employees
        {
            get
            {
                if (_employees == null)
                {
                    var newCollection = new FixupCollection<Employee>();
                    newCollection.CollectionChanged += FixupEmployees;
                    _employees = newCollection;
                }
                return _employees;
            }
            set
            {
                if (!ReferenceEquals(_employees, value))
                {
                    var previousValue = _employees as FixupCollection<Employee>;
                    if (previousValue != null)
                    {
                        previousValue.CollectionChanged -= FixupEmployees;
                    }
                    _employees = value;
                    var newValue = value as FixupCollection<Employee>;
                    if (newValue != null)
                    {
                        newValue.CollectionChanged += FixupEmployees;
                    }
                }
            }
        }
        private ICollection<Employee> _employees;

        #endregion
        #region Association Fixup
    
        private void FixupEmployees(object sender, NotifyCollectionChangedEventArgs e)
        {
            if (e.NewItems != null)
            {
                foreach (Employee item in e.NewItems)
                {
                    item.Department = this;
                }
            }
    
            if (e.OldItems != null)
            {
                foreach (Employee item in e.OldItems)
                {
                    if (ReferenceEquals(item.Department, this))
                    {
                        item.Department = null;
                    }
                }
            }
        }

        #endregion
    }
}
The differences are:
  1. The comment block on the top of department.cs is removed.
  2. The class namespace is changed to Demo.Models.Domain.
  3. The class is not a partial class anymore.
The reason to do this is to make the domain entity class independent of the Entity Framework and repository implementation. The partial class doesn’t really matter after this.
After moving entity classes into the Demo.Models project, you can remove the DataModel.tt andDataModel.Context.tt generator templates from the Demo.Data project. DataModel.Context.tt is used to generate Entity Framework context code, but because I will use the Repository pattern here and have my own way to manage context, I don’t need auto-generated context code either.

Verifying Domain Entity Classes

The easiest way to verify domain entity classes is to use them in different scenarios with Unit Test. One example here is to insert an employee hierarchy. I want to insert an employee Henry who has salary type By Hour, and then add another employee Andy who has salary type By Hour and work for Henry.
[TestMethod]
public void InsertEmployeeHierarchy_Employee_Success()
{
    // Arrange

    // Act
    Department department = 
      Demo.Models.Registry.RepositoryFactory.GetDepartmentRepository().Find(
      d => d.Name == "Sales");
    SalaryType salaryType = 
      Demo.Models.Registry.RepositoryFactory.GetSalaryTypeRepository().Find(
      s => s.Type == "By Hour");

    IEmployeeRepository employeeRepository = 
      Demo.Models.Registry.RepositoryFactory.GetEmployeeRepository();
    
    Employee employee = new Employee();
    employee.Name = "Henry";
    employee.Department = department;
    employee.SalaryType = salaryType;

    employeeRepository.Create(employee);

    Employee subordinator = new Employee();
    subordinator.Name = "Andy";
    subordinator.Department = department;
    subordinator.SalaryType = salaryType;
    subordinator.Manager = employee;

    employeeRepository.Create(employee);

    IContext context = Demo.Models.Registry.Context;
    context.SaveChanges();
    context.Clear();

    // Assert
    Department assertDepartment = 
      Demo.Models.Registry.RepositoryFactory.GetDepartmentRepository().Find(
      d => d.Name == "Sales");
    SalaryType assertSalaryType = 
      Demo.Models.Registry.RepositoryFactory.GetSalaryTypeRepository().Find(
      s => s.Type == "By Hour");

    IEmployeeRepository assertEmployeeRepository = 
      Demo.Models.Registry.RepositoryFactory.GetEmployeeRepository();
    Employee assertEmployee1 = 
      assertEmployeeRepository.Find(e => e.Name == "Henry");
    Assert.IsNotNull(assertEmployee1);
    Assert.IsTrue(assertEmployee1.Department == 
      assertDepartment && assertEmployee1.SalaryType == assertSalaryType);

    Employee assertEmployee2 = assertEmployeeRepository.Find(e => e.Name == "Andy");
    Assert.IsNotNull(assertEmployee2);
    Assert.IsTrue(assertEmployee2.Department == 
      assertDepartment && assertEmployee2.SalaryType == assertSalaryType);
    Assert.IsTrue(assertEmployee2.Manager == assertEmployee1);

    // Away
    IEmployeeRepository awayEmployeeRepository = 
      Demo.Models.Registry.RepositoryFactory.GetEmployeeRepository();
    Employee awayEmployee1 = awayEmployeeRepository.Find(d => d.Name == "Andy");
    awayEmployeeRepository.Delete(awayEmployee1);
    Employee awayEmployee2 = awayEmployeeRepository.Find(d => d.Name == "Henry");
    awayEmployeeRepository.Delete(awayEmployee2);

    IContext awayContext = Demo.Models.Registry.Context;
    awayContext.SaveChanges();
    awayContext.Clear();
}
Compile and run it. Bingo, works! The domain model can still use Entity Framework to persist and retrieve data from the database. However, it’s not required at all. We have a repository implementation with NHibernate if we want.

The Following Development

After the Data Model gets evolved into the POCO domain model with Entity Framework Database-First development style, you should switch to Entity Framework Code-First development style to continue to improve the domain model. The Domain Model, Data Model, and Entity Data Model are all independent of one another since then. All the changes need to be made manually in all the places. This is bad if you feel the Entity Framework code generator tool and the reverse engineering tool cannot be used any more, however the complicity of your domain model is already out of the limit of those tools no matter what, except you want to have an ugly, incorrect, not extensible domain model that is tied with the Entity Framework.

Summary

Though Microsoft provides three Entity Framework development styles for us to choose from, we should really base our decision on the application or project situation to choose them wisely. By mixing the different development styles, you can tackle a complicated project with less effort and better results.

Using the Code

The code is developed in Visual Studio 2010. In order to run it, you need to create the EntityFrameworkMixedStyleDevelopment database in SQL Server and run CreateTables.sql to generate all the tables. Besides, you need to update all the connection strings in the solution to connect to your local database.
<add name="EntityFrameworkMixedStyleDevelopmentEntities" 
  connectionString="metadata=res://*/DataModel.csdl|
    res://*/DataModel.ssdl|res://*/DataModel.msl;
    provider=System.Data.SqlClient;
    provider connection string="Data Source=LAPTOP;Initial 
    Catalog=EntityFrameworkMixedStyleDevelopment;
    Integrated Security=True;MultipleActiveResultSets=True"" 
  providerName="System.Data.EntityClient" />

DataAnnotations Validation for Beginner

Introduction

When you have domain entities in domain layer, usually you also have validation rules as a part of entities’ business rules. You will face the question where to specify the validation rules and how to verify the validation rules. This article will show you a way by using DataAnnotations library to specify and verify validation rules for domain entities.

Domain Entity

A domain entity is a class used to represent something in your problem domain. A typical domain entity looks like this:
public class Customer
{
 public virtual string CustomerID { get; set; }
 public virtual string CompanyName { get; set; }
 public virtual string Address { get; set; }
 public virtual string City { get; set; }
 public virtual string PostalCode { get; set; }
 public virtual string Country { get; set; }
 public virtual string Phone { get; set; }
}
This domain entity is used to represent Customer in system by holding Customer related information. I assume when adding a new customer into the system, you must provide CustomerID and CompanyName, and theCompanyName must have maximum 10 characters. If you provided value for Country, then the value must be USA. If you provided value for Phone, then the phone number must have correct format. In summary, the Customerentity has following validation rules:
  1. CustomerID is required
  2. CompanyName is required
  3. CompanyName can have maximum 10 characters
  4. Country can only be USA when there is a value
  5. Phone must have format ###-###-#### (# means digit) when there is a value

DataAnnotations

DataAnnotations is a library in .NET Framework. It resides in assemblySystem.ComponentModel.DataAnnotations. The purpose of DataAnnotations is to custom domain entity class with attributes. Therefore, DataAnnotations contains validation attributes to enforce validation rules, display attributes to specify how data from the class or member is displayed, and data modeling attributes to specify the intended use of data members and the relationships between data classes. One example of validation attribute isRequiredAttribute that is used to specify that a value must be provided. One example of display attribute isDisplayAttribute that is used to specify localizable strings for data types and members that are used in the user interface. And, one example of data modeling attribute is KeyAttribute that is used to specify the property as unique identity for the entity. We will only show how to use validation attributes in here to verify validation rules for domain entity.

Specify Validation Rule for Domain Entity

Before we can verify validation rules of Customer entity, we need to put two built-in validation attributes ofDataAnnotationsRequiredAttribute and StringLengthAttribute, on Customer class. The Customerclass will be something like this:
public class Customer
{
 [Required]
 public virtual string CustomerID { get; set; }

 [Required]
 [StringLength(15)]
 public virtual string CompanyName { get; set; }

 public virtual string Address { get; set; }

 public virtual string City { get; set; }

 public virtual string PostalCode { get; set; }

 public virtual string Country { get; set; }

 public virtual string Phone { get; set; }
}
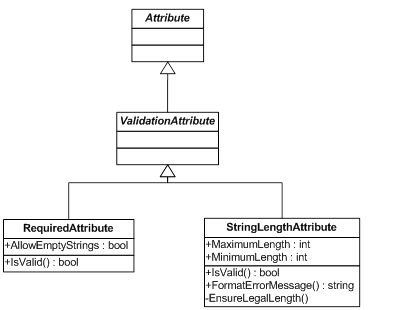
Let’s take a look at RequiredAttribute and StringLengthAttribute in detail:
ValidationAttributes.gif
RequiredAttribute and StringLengthAttribute all inherit from ValidationAttribute that is the base class of all validation attributes.
With the use of RequiredAttribute and StringLengthAttribute, we are only able to specify validation rules for the first three requirements, how about the last two requirements: Country can only be USA when there is a value and Phone must have format ###-###-#### (# means digit) when there is a value. The solution is to create custom validation attributes for them. We need to create two custom validation attributes here, one is for Countryand another one is for Phone.

CountryAttribute for Country Validation

[AttributeUsage(AttributeTargets.Field | AttributeTargets.Property, 
 AllowMultiple = false, Inherited = true)]
public class CountryAttribute: ValidationAttribute
{
 public string AllowCountry { get; set; }

 public override bool IsValid(object value)
 {
  if (value == null)
  {
   return true;
  }

  if (value.ToString() != AllowCountry)
  {
   return false;
  }

  return true;
 }
}

PhoneAttribute for Phone Validation

[AttributeUsage(AttributeTargets.Field | AttributeTargets.Property, 
 AllowMultiple = false, Inherited = true)]
public class PhoneAttribute : RegexAttribute
{
 public PhoneAttribute()
  : base(@"^[2-9]\d{2}-\d{3}-\d{4}$", RegexOptions.IgnoreCase)
 { }
}
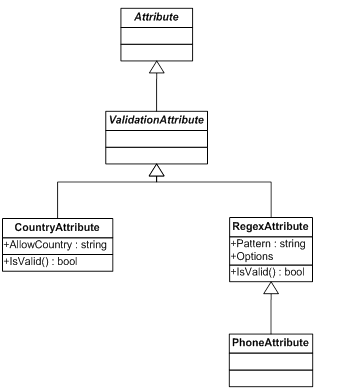
The class diagram is like this:
CustomValidationAttributes.gif
At the end, Customer class with all validation attributes on it will be like this:
public class Customer
{
 [Required]
 public virtual string CustomerID { get; set; }

 [Required]
 [StringLength(15)]
 public virtual string CompanyName { get; set; }

 public virtual string Address { get; set; }

 public virtual string City { get; set; }

 public virtual string PostalCode { get; set; }

 [Country(AllowCountry="USA")]
 public virtual string Country { get; set; }

 [Phone]
 public virtual string Phone { get; set; }
}

Verify Validation Rules for Domain Entity

After validation rules are specified on Customer entity, we can verify Customer against the rules in our application with DataAnnotations.Validator class.
[TestMethod]
public void ValidateCustomer_Customer_NoError()
{
 // Arrange
 Customer customer = new Customer();
 customer.CustomerID = "aaa";
 customer.CompanyName = "AAA company";

 // Act
 var validationResult = ValidationHelper.ValidateEntity<customer>(customer);

 // Assert
 Assert.IsFalse(validationResult.HasError);
}
ValidationHelper is a helper class that wraps up the call to DataAnnotations.Validator.
public class EntityValidationResult
{
 public IList<validationresult> Errors { get; private set; }
 public bool HasError
 {
  get { return Errors.Count > 0; }
 }

 public EntityValidationResult(IList<validationresult> errors = null)
 {
  Errors = errors ?? new List<validationresult>();
 }
}

public class EntityValidator<t> where T : class
{
 public EntityValidationResult Validate(T entity)
 {
  var validationResults = new List<validationresult>();
  var vc = new ValidationContext(entity, null, null);
  var isValid = Validator.TryValidateObject
    (entity, vc, validationResults, true);

  return new EntityValidationResult(validationResults);
 }
}

public class ValidationHelper
{
 public static EntityValidationResult ValidateEntity<t>(T entity)
  where T : class
 {
  return new EntityValidator<t>().Validate(entity);
 }
}
The line of code that does actual validation is:
var isValid = Validator.TryValidateObject(entity, vc, validationResults, true);
Note: The last parameter, validateAllProperties, of TryValidateObject method is a Boolean type variable. You must pass in true to enable verification on all types of validation attributes, include the custom validation attributes we used above. If you pass in false, only RequiredAttribute used on entity will be verified. The name of this parameter is very misleading.
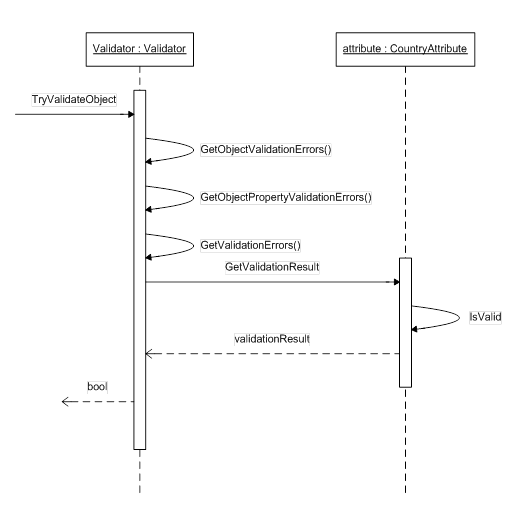
The validation process is like this:
ValidationSequence.gif

Summary

DataAnnotations library provides an easy way to specify and verify validation rules on domain entity. Also, it is opening for change by design, so developers can add their own validation attributes for their own situation. By specifying validation rules on domain entity directly allow upper layers have no worry of validation anymore.

Using the Code

The code is developed in Visual Studio 2010.