Sunday, July 22, 2012

How jQuery works


Introduction

jQuery is the most popular JavaScript library nowadays. It uses CSS selector style syntax to fetch elements in document object model (DOM) into wrapped element set, and then manipulate elements in the wrapped set with jQuery functions to archive different effect. Though the way of using jQuery is very easy and intuitive, we should still understand what is happening behind the scene to better master this JavaScript library.

Basic Concepts in jQuery

There are some basic concepts in jQuery should be known before we dig into the jQuery library

$/jQuery object and $()/jQuery() function

The $/jQuery object is a global object through which all jQuery functions are accessed.
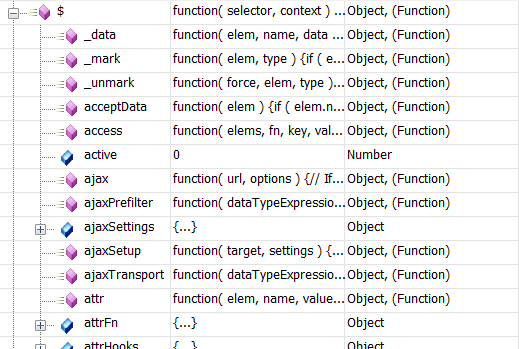
It is also a function object, so the most common approach uses it is via $()/jQuery() function. $()/jQuery() function can be used to select a group of elements in DOM. It is also known as wrapper function. One simple example of using $()/jQuery() function is this

$(“#ABC”);
or
jQuery(“#ABC”);

The parameter passed into $()/jQuery() function is selector. Selector is an expression that has CSS selector style syntax. In above example, I am trying to select elements that have id equal to #ABC.

Wrapped set

Wrapped set is an array-like structure that contains all the selected DOM elements. The above $(“#ABC”) returns back a wrapped set. You can iterate over the wrapped set like an array or access individual elements via indexer. More importantly, you can apply jQuery functions against all the selected elements.
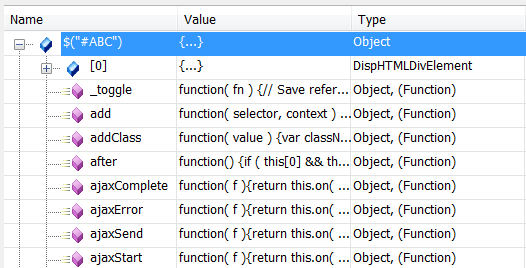
How the jQuery $()/jQuery() function works behind the scene

Because majority of jQuery function calls are started with $()/jQuery() function, so we need to understand what happening inside of it. Before go into $()/jQuery(), let’s take a look where $/jQuery object is defined. The $/jQuery object is the access point to jQuery functions. It’s a global function variable defined in jQuery. Here is the line of source code in jQuery defines it
// Expose jQuery to the global object
window.jQuery = window.$ = jQuery;
The window object represents an open window in a browser, by putting $/jQuery right under window, it is defined as a global object that can be accessed in current open window.

But, what is the “jQuery” used at the end of above line of source code? It is declared in the beginning of jQuery library
var jQuery = (function() {
…
All the magic are happening inside of jQuery object declaration expression, but if look into it directly, you will get lost, so let me simplify it before we continue.

The simplified version jQuery library source code
Caveat: the simplified version is only for research purpose. It doesn’t really have all fundamental features jQuery provides. Never use it in real project.
var jQuery = (function ()
{
 // Define a local copy of “k”
 var k = function (selector, context)
 {
  // The k object is actually just the init constructor 'enhanced'
  var kobj = new k.fn.init(selector, context);
  return kobj;
 };

 //Define k’s fn prototype, specially contains init method
 k.fn = k.prototype = {
  init: function (selector, context)
  {
   if (!selector)
   {
    return this;
   }
  }
 };

 // Give the init function the “k” prototype for later instantiation
 k.fn.init.prototype = k.fn;

 // Return “k” to the global object
 return k;
})();
From the above source code, you can see jQuery function variable is defined and assigned as result of an anonymous function call.

Sidebar: How to define anonymous function

In JavaScript, you can define an anonymous function and call it right away.

For example,
(function () { alert(“hello world”); })();
By putting function literal
function() { alert(“hello word”); }
into parentheses
(function() { alert(“hello world”); })
You can immediately invoke it with outside parentheses

Inside of the anonymous function, a function k is defined, it has signature like this
function (selector, context)
The first parameter is selector and the second parameter is context. In original jQuery source code, function k is actually named as jQuery that can be confused with the outer most jQuery function variable.

Inside of function k, a new instance of init function class is created and returned. The init function class is defined later on as k’s prototype method. It is a JavaScript style “class”.

After the function k declaration, an anonymous function class is defined as k’s prototype. Prototype is a special property on JavaScript’s function class that is used to point to another function object. So, all the instances of that function class will have access to member functions defined in the prototype function class. In here, init method is available by all instance of k function class. The init method has signature like this
function (selector, context)
The k’s prototype has init member method, in the meantime, init function’s prototype is assigned with k function’s prototype. This is a circular reference that usually should be avoided in normal programming practice, but, it’s the way jQuery make the return of init function can have access to all the methods defined on k.

Sidebar: Function is the first class object in Javascript

JavaScript is a functional programming style language, but the function is not a pure function in our traditional definition. The function can be created on fly, can have properties and methods, and can be passed to other functions. If you want to invoke the JavaScript function in traditional way, you can have something like this
function display()
{
  alert(“hello world”);
}

display();
If you want to use function as class, then you can have something like this
function Car(model)
{
  this.Model = model;

  this.Drive = function() { alert(“Go”) }  
}

var car = new Car(“Ford”);
So, the function statement is actually used to define a Car “class”. The Car class has a property Model that is initialized with parameter in function class constructor and a Drive method. So, you can create as many instance of Car class as you want. However, JavaScript’s class is not a true class because it doesn’t really have the three key characters of class in OO language.

The way k’s prototype function defined is called function literal. It is used widely in jQuery for different purposes.

Sidebar: Different ways defining function in JavaScript

1. Use function statement to define a function
function open() {
  //open logic
}
2. Use function literal to define a function
The simplest function you can define with literal is like this
var o = { }
also, you can use literal to define a function “class”
var apple = {
  type: “macintosh”,
  color: “red”,
  getInfo: function() {
    return this.color + ‘ ‘ + this.type + ‘ apple’;
  }
}
3. Use Function object to define a function
Function Object is JavaScript built-in Object. In JavaScript, I can do this
var add = new Function(a, b, “return a + b;”);
to define a function “add”. The Function will treat the first two parameters “a” and “b” as function parameters and the last parameter “return a + b” as function body.

After that, the internal k function is returned to outside variable jQuery. What the jQuery got is not just a k function, and also a closure that k function lived in.

Sidebar: What is closure in JavaScript

A closure is a context that created by JavaScript when returning the inside function to outside, so the inside function can still have access to those local variables.

An example of closure is like this
var addition = function(numberA) { return function(numberB) { alert (numberA + numberB); }}
so, you can create instance of addition with indicated numberA
var add2 = addition(2);
var add3 = addition(3);
add2(3); // it will display 5
add3(3); // it will display 6

At the end, k function is returned to the global variable jQuery.

The intricate and complex design inside of jQuery library is to make extending and using this library simple and easy. You can attach custom function to jQuery.fn to add your own business logic. And the custom function can be invoked same as built-in function by wrapped set, such as this
// Define a plugin function Test
jQuery.fn.Test = function () { alert("Test"); }

// Invoke Test function via jQuery() function
jQuery().Test();

Summary

By understanding how jQuery works, we can better master this JavaScript library. What I am showing in this article is just a skeleton of jQuery library. After grasp the basic design principal and mechanism of jQuery library, you can look into the original source code of jQuery library to learn more on how it take advantage of variant JavaScript language features to accomplish the goal of simplicity and extensibility.

Create a ComboBox web control with jQuery and ASP.NET


Introduction

ComboBox is a very common control that has no built-in support in HTML specification and in standard ASP.NET web control library, so the solution is to create one with JavaScript and wrapped up in ASP.NET custom control. You can use plain JavaScript to clip basic HTML elements into ComboBox, but it is very difficult to write, maintain, and support different browser. With the help of jQuery JavaScript library, this job becomes much easier.

Requirements

The ComboBox web control I am looking for must meet following requirements:
1. Support bind data through standard data-bound properties and methods
There are data-bound properties and methods defined by .NET component specification to separate source data with binding logics. By complaint with this convention, ComboBox web control can be easily understand and used in any data binding scenario.
2. Allow select item from the dropdown list of ComboBox with mouse
3. Allow enter data in the textbox of ComboBox and use it to filter items in dropdown list, and then select expected item with keyboard

Create a web control

To let ComboBox web control can be used in ASP.NET web application, we will create it as a custom web control. Because ComboBox behaves similar to the combination of TextBox and DropDownList, so it’s better to inherit it from both TextBox and DropDownList. Unfortunately, C# doesn’t permit multi-inheritance, so we can only choose one as the base class. Due to the most important character of ComboBox is allowing user directly entering data in it, so I decided to let it inherit from TextBox. In the meantime, I implemented DataSource, DataSourceID, DataMember properties and DataBind method in ComboBox to support data binding usage though it’s not the subclass of standard DataBoundControl. Those data binding properties and methods will forward the call to internal DropDownList control. By doing this, I don’t need to spend much effort on writing data binding code. The internal DropDownList control that ComboBox contains is only used as storage for dropdown list items. ComboBox corresponding JavaScript file, ComboBox.js, will use those data for client rendering.
During the OnPreRender stage, ComboBox outputs ComboBox.js JavaScript file into client browser. ComboBox.js is the file contains all of client side logics.
During the Render stage, ComboBox creates a HTML block with basic HTML elements to represent client side ComboBox, later on, JavaScript code in ComboBox.js clips generated HTML elements into looking and behavior what we want.

ComboBox HTML block

ComboBox HTML block is like this
<span style="position:relative;" ComboBox="1" >
 <input name="ComboBox1" type="text" value="Item 2" id="ComboBox1" class="textbox" style="width:200px;" />
 <input type="button" value="V" />
 <select name="ctl02" tabindex="-1" style="display:none;">
  <option selected="selected" value="Item 1">Item 1</option>
  <option value="Item 2">Item 2</option>
  <option value="Item 3">Item 3</option>
 </select>
 <div style="visibility:hidden; background-color:white"></div>
</span>
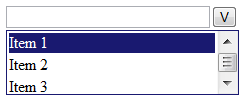
The outermost element is SPAN. It is used to contain all other elements for ComboBox control in HTML. There is a custom attribute ComboBox on it to flag SPAN as ComboBox container markup. And then a Text input element inside of SPAN is used to represent the textbox that user can enter data in ComboBox. The next element is a Button input that is used to represent the button of ComboBox. It uses “V” as button icon to distinguish with the built-in HTML select element. The following element is a Select that is used to store download list items. At the end, DIV is included in ComboBox to represent dropdown list of ComboBox. Despite nothing is initially contained in DIV, the bootstrap code in ComboBox.js will add a table into it and make it look and behave like a dropdown list.

ComboBox.js

This JavaScript file contains all logics for building up ComboBox in browser. Here I gave more detail explanation on purpose of each routing and method in ComboBox.

Initialize ComboBox (Bootsrapping)

After completed DOM rendering, bootstrapping code in ComboBox.js will go through below steps to initialize ComboBox:
1. Find all ComboBoxes on the page
2. Initialize each ComboBox by calling ComboBox_InitListData inside of jQuery .each API
3. Add click event handler for ComboBox’s dropdown button, “V” button
4. Add keydown and keyup event handler for ComboBox’s textbox
5. Add click event handler for document, so ComboBox’s dropdown list can be hidden when user click on anywhere other than ComboBox’s dropdown button
//initialize all ComboBoxes after DOM is fully loaded
$(function () {
    var $comboBoxs = $("span[ComboBox]"); //get all ComboBoxes. ComboBox is defined with span element that has ComboBox attribute

    //init each ComboBox with empty filter
    $comboBoxs.each(function (i, obj) {
        ComboBox_InitListData($(obj), "");
    });

    //add click event handler for ComboBox "V" button
    $comboBoxs.find(":button").on("click", function (e) {
        ComboBox_HideList(); //hide all ComboBoxes' dropdown list first

        var $container = $(this).closest("span"); //get the first element that matches the "span" selector, beginning at the current element and progressing up through the DOM tree
        ComboBox_InitListData($container, ""); //init ComboBox with empty filter
        $container.find("div").css({ "zIndex": "1", "visibility": "visible" }); //set css of div on zIndex and visibility
        e.stopPropagation(); //prevents the event from bubbling up the DOM tree, preventing any parent handlers from being notified of the event
    });

    //Set TextBox attribute and add keydown and keyup event handler for ComboBox textbox
    $comboBoxs.find(":text")
              .data("currentitem", -1) //current selected item is -1
              .attr("autocomplete", "off") //turn off auto complete
              .on("keydown", function (e) { //set keydown event handler
                  ComboBox_KeySelectItem(e);
              })
              .on("keyup", function (e) { //set keyup event handler
                  ComboBox_KeyFilterItem(e);
              });

    //add click event handler for document
    $(document).click(function (e) {
        var element = e.srcElement || e.target;
        if (element != undefined && element.tagName == "INPUT" && element.value == "V") {
            //when click on the ComboBox "V" button, then do nothing (note: event handler on "V" button will handle this event)
        }
        else {
            //when click on somewhere else, then hide all ComboBoxes' dropdown list
            ComboBox_HideList();
        }
    });
});

Initialize List Data

Initialize list data method creates a table inside DIV to show as a dropdown list, this is done by first find DIV in ComboBox, and then create an in memory table to hold all item from Select element. At the end, put table into ComboBox DIV and hide it up.
//init combobox items
function ComboBox_InitListData($container, filterValue) {
    var $div = $container.find("div");
    var newList = new Array();
    var oSelect = $container.find("select")[0];
    var len = oSelect.options.length;

    for (var i = 0; i &lt len; i++) {
        if (filterValue == undefined || filterValue == "") {
            newList[newList.length] = oSelect.options[i].text;
        }
        else {
            if (newList.length >= 9) {
                break;
            }
            var currVal = oSelect.options[i].text;
            if (currVal.length >= filterValue.length) {
                if (currVal.toLowerCase().substring(0, filterValue.length) == filterValue.toLowerCase()) {
                    newList[newList.length] = currVal;
                }
            }
        }
    }

    var sHtml = [];
    sHtml.push("<table border=\"0\" cellpadding=\"0\" cellspace=\"0\" width=\"100%\" border=\"1\" style=\"z-index:10; background-color:white;\">");
    for (var i = 0; i < newList.length; i++) {
        sHtml.push("<tr onMouseOver=\"this.bgColor='#191970'; this.style.color='#ffffff'; this.style.cursor='default'; \" onMouseOut=\"this.bgColor='#ffffff'; this.style.color='#000000';\">");
        sHtml.push("<td nowrap onClick=\"ComboBox_SelectItemWithMouse(this);\">");
        sHtml.push((newList[i] == "" ? " " : newList[i]));
        sHtml.push("</td>");
        sHtml.push("</tr>");
    }
    sHtml.push("</table>");

    $div.html(sHtml.join('')); //set the HTML contents of div to concatenated string from sHtml arrary

    $div.css("overflowY", "auto"); //oTmp.style.overflowY = "auto";
    $div.css("border", "1px solid midnightblue"); //oTmp.style.border = "1px solid midnightblue";
    $div.css("position", "absolute"); //oTmp.style.position = "absolute";
    $div.css("visibility", "hidden"); //oTmp.style.visibility = "hidden";

    var count = $container.find("table td").size(); //get total ComboBox items
    var $text = $container.find(":text"); //get textbox element
    var $button = $container.find(":button") //get button element
    $div.css("width", $button.outerWidth() + $button.offset().left - $text.offset().left); //make the dropdown list same width as textbox + "V" button
    if (count > 7 || count == 0) {
        $div.css({ "height": "150" }); //limit the height of dropdown list when there is more than 7 items or default the height of dropdown list when there is no item
    }
    else { 
        $div.css({ "height": count * 21 }); //set the height of dropdown box same as total of items' height. Each item's height is 21
    }
}

Hide List

ComboBox dropdown list should not visible when user is working on other part of the page. This is the common behavior of a Select element in HTML. By find all ComboBoxes’ dropdown list container, DIV element, and set it as hidden with CSS will make all ComboBoxes’ dropdown list invisible.
//hide ComboBox dropdown list
function ComboBox_HideList() {
    $("span[ComboBox]").find("div").css("visibility", "hidden");
}

Is List Hidden

In most cases, ComboBox behave differently based on whether dropdown list is visible, so this method is used to provide visibility status of the dropdown list.
//is ComboBox dropdown list hidden
function ComboBox_IsListHidden($container) {
    return $container.find("div").css("visibility") == "hidden";
}

Set Item in Dropdown List

Every time, a key is pressed, ComboBox will try to handle Up, Down, Enter, and Escape key to select an item in Dropdown List. This makes dropdown list of ComboBox behave same with dropdown list of Select.
//keydown
function ComboBox_KeySelectItem(e) {
    var txt = e.srcElement || e.target;
    var currentitem = $(txt).data("currentitem");
    var val = $.trim($(txt).val()); //get value in textbox
    var $container = $(txt).closest("span[ComboBox]"); //get ComboBox container that is defined with span element and ComboBox attribute

    var key = e.keyCode || e.which; //get key code
    switch (key) {
        case 38: //up
            if (val == "" || ComboBox_IsListHidden($container)) {
                return;
            }
            --currentitem;
            $(txt).data("currentitem", currentitem);
            ComboBox_ChangeItemWithKey(txt);
            break;
        case 40: //down
            if (val == "" || ComboBox_IsListHidden($container)) {
                return;
            }
            currentitem++;
            $(txt).data("currentitem", currentitem)
            ComboBox_ChangeItemWithKey(txt);
            break;
        case 13: //enter   
            if (!ComboBox_IsListHidden($container)) {
                ComboBox_HideList();
                return false;
            }
            break;
        case 27: //esc
            ComboBox_HideList();
            return false;
            break;
        default:
            break;
    }
}

Reset Dropdown List

After a key gets released, the dropdown list should be reset to match with the entered text in textbox.
//keyup
function ComboBox_KeyFilterItem(e) {
    var txt = e.srcElement || e.target;

    //do nothing if up, down, enter, esc key pressed
    if (e.keyCode == 38 || e.keyCode == 40 || e.keyCode == 13 || e.keyCode == 27) {
        return;
    }

    $(txt).data("currentitem", -1);
    var val = $(txt).val();
    if (val == "") {
        ComboBox_HideList();
        return;
    }

    var $container = $(txt).closest("span[ComboBox]");
    ComboBox_InitListData($container, val);

    var $div = $container.find("div");
    $div.css({ "zIndex": "1", "visibility": "visible" });

    //hide dropdown list if there is no item
    if ($div.find("td").size() == 0) {
        ComboBox_HideList();
    }
}

Change Item

When current item is changed, ComboBox will toggle color of text and background to make the current item appear as highlighted.
//change item
function ComboBox_ChangeItemWithKey(txt) {
    var $txt = $(txt);
    var currentitem = $txt.data("currentitem");
    var table = $txt.closest("span[ComboBox]").find("table")[0];

    for (i = 0; i < table.rows.length; i++) {
        table.rows[i].bgColor = "#ffffff";
        table.rows[i].style.color = "#000000";
    }
    if (currentitem < 0) {
        currentitem = table.rows.length - 1;
    }
    if (currentitem == table.rows.length) {
        currentitem = 0;
    }
    $txt.data("currentitem", currentitem);

    if (table.rows[currentitem] == null) {
        ComboBox_HideList();
        return;
    }
    table.rows[currentitem].bgColor = "#191970"; //darkblue color
    table.rows[currentitem].style.color = "#ffffff"; //whit color
    $txt.val($(table.rows[currentitem].cells[0]).text());
}

Select Item

The dropdown list item can be either selected with mouse or keyboard, after an item is selected, the value of selected item will be assigned to textbox and dropdown list will be closed.
//select item
function ComboBox_SelectItemWithMouse(td) {
    var $div = $(td).closest("div");
    var $txt = $div.parent().find(":text");
    var selectedValue = $(td).text();
    if ($.trim(selectedValue) == "") {
        selectedValue = "";
    }
    $txt.val(selectedValue);
    $txt[0].focus();
    $div.css("visibility", "hidden");
}

jQuery 1.7 attaching event handler API

The ComboBox uses new attaching event handler API, .on() method, of jQuery 1.7 to define event handler. The .on() method is the preferred method for attaching event handlers to an element. Users of older versions of jQuery should use .delegate() in preference to .live().

$(selector).live(events, data, handler); // jQuery 1.3+
$(document).delegate(selector, events, data, handler); // jQuery 1.4.3+
$(document).on(events, selector, data, handler); // jQuery 1.7+ 

How to use ComboBox

After referenced custom web control assembly in Visual Studio project, the simplest way to use ComboBox is just drag it from toolbox into ASP.NET web page.


By drop it into ASPX page, Visual Studio will automatically generate markup for ComboBox
<%@ Page Language="C#" AutoEventWireup="true" CodeBehind="Default.aspx.cs" Inherits="Demo.Web.Default" %>

<%@ Register assembly="Demo.WebControls" namespace="Demo.WebControls" tagprefix="cc1" %>

<!DOCTYPE html PUBLIC "-//W3C//DTD XHTML 1.0 Transitional//EN" "http://www.w3.org/TR/xhtml1/DTD/xhtml1-transitional.dtd">

<html xmlns="http://www.w3.org/1999/xhtml">
<head runat="server">
    <title></title>
    <script type="text/javascript" src="Scripts/jquery-1.7.2.js"></script>
</head>
<body>
    <form id="form1" runat="server">
    <div>
        <cc1:ComboBox ID="ComboBox1" runat="server"></cc1:ComboBox>
    </div>
    </form>
</body>
</html>
Add some code-behind code to bind ComboBox with a List collection.
        protected void Page_Load(object sender, EventArgs e)
        {
            if (!IsPostBack)
            {
                List<string> data = new List<string>();
                data.Add("Item 1");
                data.Add("Item 2");
                data.Add("Item 3");
                ComboBox1.DataSource = data;
                ComboBox1.DataBind();
            }
        }
This is what ComboBox looks like on screen

Summary

With the help of jQuery, we can combine those basic HTML elements into a more complicate client side component – ComboBox.