Introduction
Entity Framework is the ORM framework from Microsoft. Microsoft provides three development styles for it: Database-First, Model-First, and Code-First. They all look promising in Microsoft sample projects. But, I couldn’t follow any of them all along in my recent project. I end up used a mixed style to develop the application.
Development Styles in Entity Framework
There are three development styles in Entity Framework provided by Microsoft for enterprise application development.
Database-First Development
Database-first development in Entity Framework is to have a database first, then generate the Entity Data Model from it. Before Object-Oriented Programming got attention, most enterprise applications (we used to call them MIS, Management Information Systems, in the old days) started with a data model. The reason to do this is because the database is the central piece of the application. Most enterprise applications mainly dealt with data and contained almost nothing but CRUD operations. On top of this, most business rules were stored in the database. Relational databases, such as Sybase, DB2, Oracle, or SQL Server, are all built on the same relational database concept and using SQL as the query language. They have been used for decades and most developers are familiar with them and know how to use them. Even now, there are still a lot of enterprise applications built around the database. Therefore, when Object-Oriented Programming got popular and developers moved to the ideas of building an application around a domain model, they still want to generate the domain model from the data model to save time and effort, or to smooth the transition. Database-First development has a lot of advantages. It can directly use any existing system’s data model. It allows most developers who have database experience to feel comfortable on the transition. Even developers can think in terms of the domain model. They sometimes still want to have the data model first because the data model tool is easy to use.
Pros:
- Easier for developers who have database experience.
- Easier for upgrading legacy systems that already have a mature data model in place.
- Easier for a system that mainly deals with data and only has CRUD operations.
Cons:
- The domain model generated is usually not very mature. Developer needs to fine tune it in the Entity Data Model designer. The limitations of the Entity Data Model does not allow the developer to improve much.
- Need corresponding partial class to add a domain rule method or additional properties for the domain model.
- The domain model is tied with Entity Framework. Therefore it’s not easy to use the domain model in other places that do not need the Entity Framework.
- A hard-core OO developer will not go this route because they want to think in terms of the domain model.
Model-First Development
When the Entity Framework team started to design this ORM tool, they really wanted to come up with something easier for the application designer and architect. Therefore, they created a pretty sophistic Entity Data Model designer to allow the application designer and architect to create visible entity data models in it. Then they can use the entity data model to generate the classes and tables.
Pros:
- Allow application designer and architect to think and design the model first.
- This model is database agnostic, therefore it can be used to generate tables in any relational database.
- The pretty sophistic Entity Data Model designer is easier for the application designer and architect. It saves time on defining the model in an XML file.
- Easier for a newbie who does not have much Entity Framework experience.
Cons:
- After generating the domain class, you still need to have a partial class for the corresponding domain class to add business rule methods and properties.
- The domain model is tied with Entity Framework. Therefore it’s not easy to use the domain model in places that do not need the Entity Framework.
Code-First Development
Developers from Java camp or who have worked with NHibernate before are already used to designing domain classes as POJO or POCO. This way, they can completely control how the domain model looks like and their behaviors without sacrificing too much on the limitations of the persistent mechanism. This is why the Code-First development style is used by seasoned developers. The Code-First development in Entity Framework can result in a very clean domain model. This domain model can be easily re-used in other applications or combined with other persistent mechanisms.
Pros:
- Can realize complicated domain requirements.
- Can have a very clean and elegant domain model that is represented with POCO.
- Not tied with Entity Framework, therefore domain model can be easily used in other applications or with other persistent mechanisms.
Cons:
- Needs more effort on creating domain classes.
- Needs to map the domain model to data model with the attribute or Entity Data Model.
- Not a good choice for an Entity Framework or OO Programming newbie. Only seasoned OO developers can really master it very well.
Mixed Style Development
Each development style in Entity Framework has its pros and cons. I personally like the Code-First development style more because a decent domain model is very crucial to an enterprise application in the long run. But I don’t want to hand type every class, especially when the data model is already available or creating a data model is easier in the requirement analysis stage. Therefore, what I actually did is to start with Database-First development style in Entity Framework, then evolve the data model into a pure POCO style domain model, eventually switching to Code-First development style.
Data Model
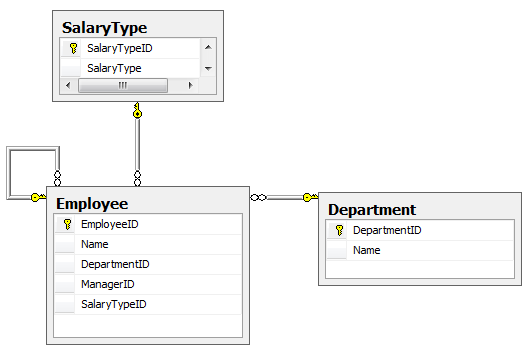
I usually start with a data model first when the system already has a pretty complete data model or when the data model is easier to communicate with business people. Just use Visio or any data model tool, and I can quickly finish the data model and generate tables in the database. In here, I have a sample employee management system that has a data model like this:
Entity Data Model
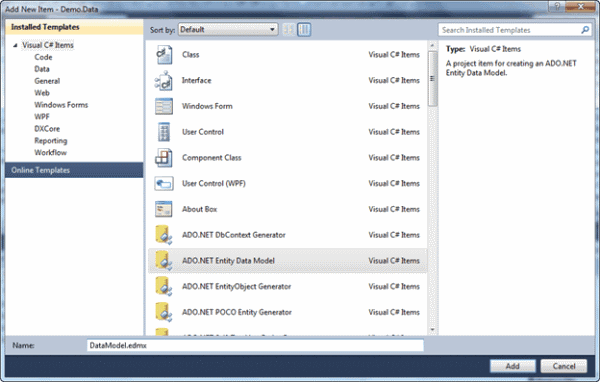
Create a Class Library project in Visual Studio. Then add an ADO.NET Entity Data Model item in it calledDataModel.edmx.
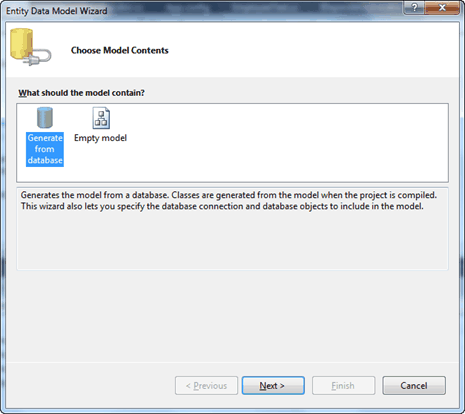
Follow the wizard and choose the “Generate from database” option.
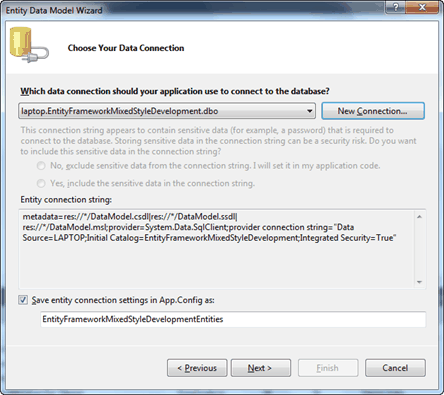
Then, create a new connection string for the database, and give the name of the entity connection setting.
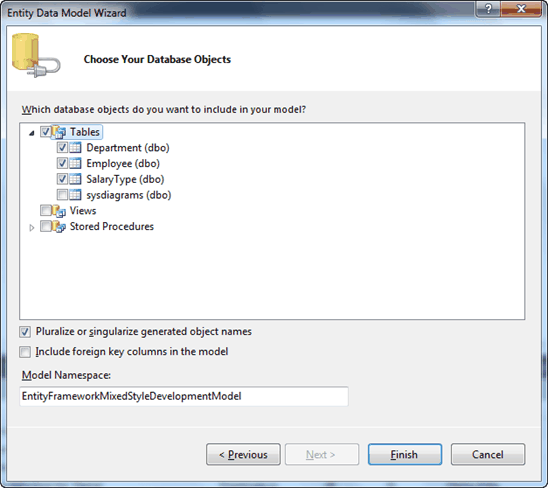
Then, select the tables you want to include in the Entity Data Model and provide the namespace. One thing I usually do in here is uncheck the “Include foreign key columns in the model” option. The reason for doing this is to avoid the foreign key identity field being added into the Entity Data Model. The Entity Data Model uses the navigation property to represent the association between the current entity and another entity. Having a foreign key ID field in your model is a trade-off for some special cases or for performance reasons. I really don’t like it because it pollutes my model and confuses the developer about which one to be used.
In the end, click the Finish button to generate the Entity Data Model.
Fixing the Entity Data Model
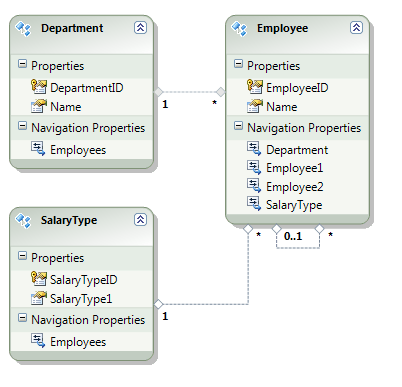
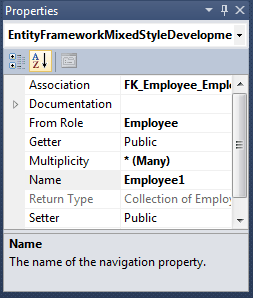
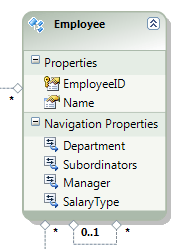
If you compare the just generated Entity Data Model with the Data Model, you will wonder why it is so different. In the data model, we have an employee table that is used to store employee information. The employee is identified with the EmployeeID in the table and it is identified with Name in real life. An employee could have a manager that is also an employee. Hence, there is a ManagerID column in the Employee table to reference to itself. The employee has a SalaryTypeID field that represents the salary type. It references the SalaryType table for detailed salary type information, such as By Hour or By Annual. An employee must belong to a department and a department can contain multiple employees. According to the data model explanation, the Entity Data Model automatically generated from the Data Model doesn’t really reflect what we think. There are two unclear navigation fields, Employee1 and Employee2, in the Employee entity.
Employee1 has Multiplicity “*(Many)”:
Employee2 has Multiplicity “0..1 (Zero or One)”:
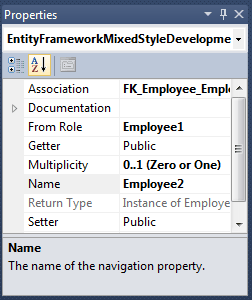
From the property detail information, we can tell Employee1 represents an Employee collection, and also means all the employees the current employ is in charge of. Employee2 represents the manager of the current employee. Hence, we should change the name of the navigation fields to Subordinators and Manager to reflect the real meaning.
The SalaryType entity has a different situation. There is an employees navigation field on the SalaryType entity. It represents all the employees that have the same salary type. However, if you have some experience with enterprise applications, you will know the salary type as a lookup entity usually only need be referenced from a business entity. To get all business entities directly from the lookup entity is not so critical. You can accomplish it with a LINQ query even when there is no collection property in the lookup entity. By removing the employees navigation property from the SalaryType entity will simplify your Entity Data Model and make the model more focused on the important business problems. Another issue in the SalaryType entity is the
SalaryType1 property. The SalaryType column in the SalaryType table is used to represent the type of salary. However, because of the “limitation” of a .NET class that cannot have a property name same as the class name, the Entity Data Model generation wizard changes the illegal name to have the number 1 at the end. The salarytype1 property looks ugly from the developer’s view. We should change it to “Type” to make it more meaningful. Following is what the SalaryType entity looks like after the changes: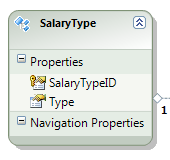
The Department entity is the only entity that doesn’t need to be fixed. Department has an
Employees collection that represents all the employees in the current department. The employee entity also has a Department property to reference back to the department. It is a parent-child relationship.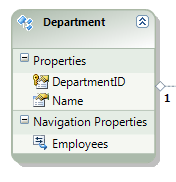
POCO Style Domain Model
If you stop in here, you will have a pretty good Database-First application. Your Domain Model can be auto-generated from the Entity Data Model during the build process. But our goal is to have a domain model that is composed with POCO style classes and no dependency on the Entity Framework. This kind of a domain model can be easily reused in different applications with other persistent technologies, such as ADO.NET or NHibernate. You can also have a different repository system, such as File. So, how do we get the POCO style domain model? The first thing we want to do is to clear up Custom Tool.
br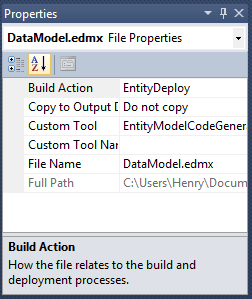
The Custom Tool setting is by default EntityModelCodeGenerator. This setting is used to tell the compiler to generate domain classes from the Entity Data Model. By clearing it up, we will not use it to generate domain classes. The reason is we want to use another code generator template, the ASP.NET POCO Entity Generator. This template is used to create POCO style domain entity classes for us. A POCO style domain entity contains only domain entity properties and methods. There is no entity framework related code in it. You can use mouse right click onDataModel.edmx to bring up the context menu, and then select the Add Code Generation Item… menu to open up the Add New Item window. Select the ADO.NET POCO Entity Generator and give DataModel.tt as the generator template name.
Note: if you directly add this template in the project instead of creating it from the DataModel.edmx context menu, you will get an error when trying to generate domain classes. This is because the template added fromDataModel.edmx has a related DataModel file location set up.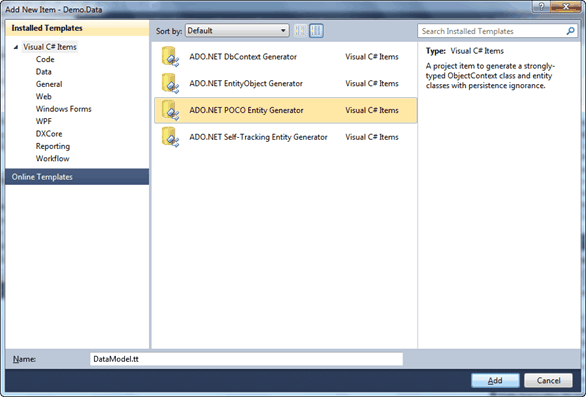
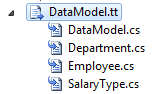
After you have the POCO entity generator template in your project, you will see a list of domain entity classes generated automatically. The domain entity classes will be re-generated after changing DataModel.tt.
A
Department domain entity class looks like this://------------------------------------------------------------------------------
// <auto-generated>
// This code was generated from a template.
//
// Changes to this file may cause incorrect behavior and will be lost if
// the code is regenerated.
// </auto-generated>
//------------------------------------------------------------------------------
using System;
using System.Collections;
using System.Collections.Generic;
using System.Collections.ObjectModel;
using System.Collections.Specialized;
namespace Demo.Data
{
public partial class Department
{
#region Primitive Properties
public virtual int DepartmentID
{
get;
set;
}
public virtual string Name
{
get;
set;
}
#endregion
#region Navigation Properties
public virtual ICollection<Employee> Employees
{
get
{
if (_employees == null)
{
var newCollection = new FixupCollection<Employee>();
newCollection.CollectionChanged += FixupEmployees;
_employees = newCollection;
}
return _employees;
}
set
{
if (!ReferenceEquals(_employees, value))
{
var previousValue = _employees as FixupCollection<Employee>;
if (previousValue != null)
{
previousValue.CollectionChanged -= FixupEmployees;
}
_employees = value;
var newValue = value as FixupCollection<Employee>;
if (newValue != null)
{
newValue.CollectionChanged += FixupEmployees;
}
}
}
}
private ICollection<Employee> _employees;
#endregion
#region Association Fixup
private void FixupEmployees(object sender, NotifyCollectionChangedEventArgs e)
{
if (e.NewItems != null)
{
foreach (Employee item in e.NewItems)
{
item.Department = this;
}
}
if (e.OldItems != null)
{
foreach (Employee item in e.OldItems)
{
if (ReferenceEquals(item.Department, this))
{
item.Department = null;
}
}
}
}
#endregion
}
}Multiple things you will notice in the above code:
- There is a comment block at the top of the class file that reminds the developer not to add their own code in this file because the generator could overwrite all the changes.
- The namespace of the department class is
Demo.Data. This is my repository implementation layer name. - The department class is a partial class. Hence I can add another department partial class in the Demo.Data project to have my own properties or methods without getting overwritten by the code generator.
- There is an Association Fixup section that contains code to correct the parent-child relationship for Department and Employee.
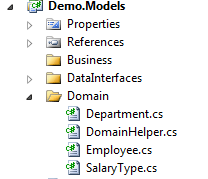
I like all the domain entity classes generated with the ASP.NET POCO Entity Generator, but I don’t like the idea of binding domain entity classes with the repository layer. Therefore I made a big change. I changed the generator template to generate the class code I want. Then I copied them all into the Demo.Models project.
The
Department class looks like this after the modified generator template:using System;
using System.Collections;
using System.Collections.Generic;
using System.Collections.ObjectModel;
using System.Collections.Specialized;
namespace Demo.Models.Domain
{
public class Department
{
#region Primitive Properties
public virtual int DepartmentID
{
get;
set;
}
public virtual string Name
{
get;
set;
}
#endregion
#region Navigation Properties
public virtual ICollection<Employee> Employees
{
get
{
if (_employees == null)
{
var newCollection = new FixupCollection<Employee>();
newCollection.CollectionChanged += FixupEmployees;
_employees = newCollection;
}
return _employees;
}
set
{
if (!ReferenceEquals(_employees, value))
{
var previousValue = _employees as FixupCollection<Employee>;
if (previousValue != null)
{
previousValue.CollectionChanged -= FixupEmployees;
}
_employees = value;
var newValue = value as FixupCollection<Employee>;
if (newValue != null)
{
newValue.CollectionChanged += FixupEmployees;
}
}
}
}
private ICollection<Employee> _employees;
#endregion
#region Association Fixup
private void FixupEmployees(object sender, NotifyCollectionChangedEventArgs e)
{
if (e.NewItems != null)
{
foreach (Employee item in e.NewItems)
{
item.Department = this;
}
}
if (e.OldItems != null)
{
foreach (Employee item in e.OldItems)
{
if (ReferenceEquals(item.Department, this))
{
item.Department = null;
}
}
}
}
#endregion
}
}The differences are:
- The comment block on the top of department.cs is removed.
- The class namespace is changed to
Demo.Models.Domain. - The class is not a partial class anymore.
The reason to do this is to make the domain entity class independent of the Entity Framework and repository implementation. The partial class doesn’t really matter after this.
After moving entity classes into the Demo.Models project, you can remove the DataModel.tt andDataModel.Context.tt generator templates from the Demo.Data project. DataModel.Context.tt is used to generate Entity Framework context code, but because I will use the Repository pattern here and have my own way to manage context, I don’t need auto-generated context code either.
Verifying Domain Entity Classes
The easiest way to verify domain entity classes is to use them in different scenarios with Unit Test. One example here is to insert an employee hierarchy. I want to insert an employee Henry who has salary type By Hour, and then add another employee Andy who has salary type By Hour and work for Henry.
[TestMethod]
public void InsertEmployeeHierarchy_Employee_Success()
{
    // Arrange

    // Act
    Department department =
      Demo.Models.Registry.RepositoryFactory.GetDepartmentRepository().Find(
      d => d.Name == "Sales");
    SalaryType salaryType =
      Demo.Models.Registry.RepositoryFactory.GetSalaryTypeRepository().Find(
      s => s.Type == "By Hour");

    IEmployeeRepository employeeRepository =
      Demo.Models.Registry.RepositoryFactory.GetEmployeeRepository();

    Employee employee = new Employee();
    employee.Name = "Henry";
    employee.Department = department;
    employee.SalaryType = salaryType;

    employeeRepository.Create(employee);

    Employee subordinator = new Employee();
    subordinator.Name = "Andy";
    subordinator.Department = department;
    subordinator.SalaryType = salaryType;
    subordinator.Manager = employee;

    employeeRepository.Create(employee);

    IContext context = Demo.Models.Registry.Context;
    context.SaveChanges();
    context.Clear();

    // Assert
    Department assertDepartment =
      Demo.Models.Registry.RepositoryFactory.GetDepartmentRepository().Find(
      d => d.Name == "Sales");
    SalaryType assertSalaryType =
      Demo.Models.Registry.RepositoryFactory.GetSalaryTypeRepository().Find(
      s => s.Type == "By Hour");

    IEmployeeRepository assertEmployeeRepository =
      Demo.Models.Registry.RepositoryFactory.GetEmployeeRepository();
    Employee assertEmployee1 =
      assertEmployeeRepository.Find(e => e.Name == "Henry");
    Assert.IsNotNull(assertEmployee1);
    Assert.IsTrue(assertEmployee1.Department ==
      assertDepartment && assertEmployee1.SalaryType == assertSalaryType);

    Employee assertEmployee2 = assertEmployeeRepository.Find(e => e.Name == "Andy");
    Assert.IsNotNull(assertEmployee2);
    Assert.IsTrue(assertEmployee2.Department ==
      assertDepartment && assertEmployee2.SalaryType == assertSalaryType);
    Assert.IsTrue(assertEmployee2.Manager == assertEmployee1);

    // Away
    IEmployeeRepository awayEmployeeRepository =
      Demo.Models.Registry.RepositoryFactory.GetEmployeeRepository();
    Employee awayEmployee1 = awayEmployeeRepository.Find(d => d.Name == "Andy");
    awayEmployeeRepository.Delete(awayEmployee1);
    Employee awayEmployee2 = awayEmployeeRepository.Find(d => d.Name == "Henry");
    awayEmployeeRepository.Delete(awayEmployee2);

    IContext awayContext = Demo.Models.Registry.Context;
    awayContext.SaveChanges();
    awayContext.Clear();
}
Compile and run it. Bingo, works! The domain model can still use Entity Framework to persist and retrieve data from the database. However, it’s not required at all. We have a repository implementation with NHibernate if we want.
The Following Development
After the Data Model gets evolved into the POCO domain model with Entity Framework Database-First development style, you should switch to Entity Framework Code-First development style to continue to improve the domain model. The Domain Model, Data Model, and Entity Data Model are all independent of one another since then. All the changes need to be made manually in all the places. This is bad if you feel the Entity Framework code generator tool and the reverse engineering tool cannot be used any more, however the complicity of your domain model is already out of the limit of those tools no matter what, except you want to have an ugly, incorrect, not extensible domain model that is tied with the Entity Framework.
Summary
Though Microsoft provides three Entity Framework development styles for us to choose from, we should really base our decision on the application or project situation to choose them wisely. By mixing the different development styles, you can tackle a complicated project with less effort and better results.
Using the Code
The code is developed in Visual Studio 2010. In order to run it, you need to create the EntityFrameworkMixedStyleDevelopment database in SQL Server and run CreateTables.sql to generate all the tables. Besides, you need to update all the connection strings in the solution to connect to your local database.
<add name="EntityFrameworkMixedStyleDevelopmentEntities"
  connectionString="metadata=res://*/DataModel.csdl|
    res://*/DataModel.ssdl|res://*/DataModel.msl;
    provider=System.Data.SqlClient;
    provider connection string="Data Source=LAPTOP;Initial
    Catalog=EntityFrameworkMixedStyleDevelopment;
    Integrated Security=True;MultipleActiveResultSets=True""
  providerName="System.Data.EntityClient" />